Omnibot with BLE (Arduino GIGA & ESP32)
This project showcases the integration of BLE Bluetooth communication between the Arduino GIGA and ESP32 for the wireless control of an OmniBot.
Devices & Components
1
Arduino GIGA R1 WiFi
1
40 colored female-female jumper wires
2
Arduino Motor Shield Rev3
1
3WD Smart Robot Car Chassis Kit
1
ESP32 C6 DevKitC-1 N8
1
Push Button
1
Battery Shield
1
18650 Battery Shield V3 For Raspberry Pi WEMOS For Arduino Micro USB Type-A USB Output Diy Kit
Hardware & Tools
1
drill, screwdriver, soldering iron
Software & Tools
Arduino IDE
Project description
Code
Controller
cpp
This code is for the controller.
1// Make sure to install esp32 by Espressif Systems in Boards Manager
2// Uninstall ArduinoBLE by Arduino in Library Manager if installed
3// Or other libraries that have files named BLEDevice.h, BLEUtils.h, BLEServer.h
4
5// Bluetooth server module
6#include <BLEDevice.h>
7#include <BLEUtils.h>
8#include <BLEServer.h>
9
10// See the following for generating UUIDs:
11// https://www.uuidgenerator.net/
12#define SERVICE_UUID        "3ac8b22d-fcb0-49df-a499-d12d04b1181b"
13#define CHARACTERISTIC_UUID "48a8ebfb-5895-485a-825d-1b6cee20664d"
14
15// Define joystick pins
16const int buttonPin = 4;  // Button connected to GPIO 4
17const int yPin = 5;       // X-axis connected to GPIO 5
18const int xPin = 6;       // Y-axis connected to GPIO 6
19
20BLECharacteristic *pCharacteristic;
21
22void setup() {
23 // Initialize serial communication
24 Serial.begin(115200);
25
26 // Initialize Bluetooth
27 Serial.println("Starting BLE work!");
28 BLEDevice::init("ESP32_Controller"); // Create the BLE Device
29 BLEServer *pServer = BLEDevice::createServer();
30 BLEService *pService = pServer->createService(SERVICE_UUID);
31
32  pCharacteristic = pService->createCharacteristic(
33    CHARACTERISTIC_UUID,
34    BLECharacteristic::PROPERTY_READ |
35    BLECharacteristic::PROPERTY_NOTIFY // Allow notifications
36  );
37
38 pCharacteristic->setValue("1600,1600,1"); // Initial dummy value
39 pService->start();
40
41 BLEAdvertising *pAdvertising = BLEDevice::getAdvertising();
42 pAdvertising->addServiceUUID(SERVICE_UUID);
43 pAdvertising->setScanResponse(true);
44 pAdvertising->setMinPreferred(0x06);  // functions that help with iPhone connections issue
45 pAdvertising->setMinPreferred(0x12);
46 BLEDevice::startAdvertising();
47
48 Serial.println("BLE ready. Now broadcasting!");
49 // Set button pin as input with pullup resistor
50 pinMode(buttonPin, INPUT_PULLUP);
51}
52
53void loop() {
54 // Read X and Y values (0 - 4095 on ESP32)
55 int xValue = analogRead(xPin);
56 int yValue = analogRead(yPin);
57 // Read button state (0 when pressed, 1 when released)
58 int buttonState = digitalRead(buttonPin);
59
60 // Format data: "x,y,button"
61 String data = String(xValue) + "," + String(yValue) + "," + String(buttonState);
62
63 // Send data via BLE
64 pCharacteristic->setValue(data.c_str());
65 pCharacteristic->notify();
66
67 // Debug output
68 Serial.println(data);
69 delay(20); // Reduce if more responsiveness needed
70
71}
Omnibot
cpp
This code is for the robot.
1// Now install ArduinoBLE by Arduino in Library Manager
2#include <RPC.h>        // Library for M4 chip
3#include <ArduinoBLE.h> // Bluetooth Library
4
5int xValue = 0, yValue = 0, buttonState = 0;
6int Xspeed = 0, Yspeed = 0;
7
8// Presets for switch 1 to change direction
9volatile bool SW1;
10volatile bool state1 = 0;  // 0 = CCW, 1 = CW
11volatile bool preSW1 = 0;  // preset = 1 to start at CW
12
13// Motor pins
14const int in1 = 22, in2 = 23, PWM1 = 2; //motor 1
15const int in3 = 24, in4 = 25, PWM2 = 3; //motor 2
16const int in5 = 26, in6 = 27, PWM3 = 4; //motor 3
17
18// Bluetooth setup
19const char* peripheralName = "ESP32_Controller";
20const char* characteristicUUID = "48a8ebfb-5895-485a-825d-1b6cee20664d";
21
22BLEDevice peripheral;
23BLECharacteristic joystickCharacteristic;
24
25void setup() {
26  RPC.begin();         // Boots M4
27  Serial.begin(115200);  // Initialize serial communication
28
29  // Motor pin config
30  pinMode(PWM1, OUTPUT); pinMode(in1, OUTPUT); pinMode(in2, OUTPUT);
31  pinMode(PWM2, OUTPUT); pinMode(in3, OUTPUT); pinMode(in4, OUTPUT);
32  pinMode(PWM3, OUTPUT); pinMode(in5, OUTPUT); pinMode(in6, OUTPUT);
33
34  pinMode(8, INPUT_PULLUP);  // Direction toggle switch
35    // Initialize BLE
36  if (!BLE.begin()) {
37    Serial.println("Failed to start BLE!");
38    while (1);
39  }
40
41  BLE.scan();  // Start scanning for peripheral
42}
43
44void loop() {
45
46  if (!peripheral || !peripheral.connected()) {
47    peripheral = BLE.available();
48
49    if (peripheral && peripheral.localName() == peripheralName) {
50      BLE.stopScan();
51      Serial.print("Connecting to ");
52      Serial.println(peripheral.localName());
53
54      if (peripheral.connect()) {
55        Serial.println("Connected to joystick!");
56
57        if (peripheral.discoverAttributes()) {
58          joystickCharacteristic = peripheral.characteristic(characteristicUUID);
59
60          if (joystickCharacteristic) {
61            joystickCharacteristic.subscribe();  // Enable notifications
62            Serial.println("Subscribed to joystick data.");
63          }
64        }
65      } else {
66        Serial.println("Failed to connect.");
67        BLE.scan(); // Retry
68      }
69    }
70    return;
71  }
72
73  // Check for new joystick data
74  if (joystickCharacteristic.valueUpdated()) {
75      int len = joystickCharacteristic.valueLength();
76      uint8_t buffer[len + 1];
77      joystickCharacteristic.readValue(buffer, len);
78      buffer[len] = '\0';  // Null-terminate
79
80      String value = String((char*)buffer);
81      // Serial.print("Received: "); Serial.println(value);
82
83      sscanf(value.c_str(), "%d,%d,%d", &xValue, &yValue, &buttonState);
84  }
85
86
87  if (xValue >= 1570) {
88    digitalWrite(in1, HIGH);  digitalWrite(in2, LOW);  // Forward
89    digitalWrite(in3, HIGH);  digitalWrite(in4, LOW);
90    Xspeed = map(xValue, 1570, 3217, 0, 255);
91    analogWrite(PWM1, Xspeed);
92    analogWrite(PWM2, Xspeed);
93  }
94  else if (xValue <= 1560) {
95    digitalWrite(in1, LOW); digitalWrite(in2, HIGH);   // Backward
96    digitalWrite(in3, LOW); digitalWrite(in4, HIGH);
97    Xspeed = map(xValue, 1560, 0, 0, 255);
98    analogWrite(PWM1, Xspeed);
99    analogWrite(PWM2, Xspeed);
100  }
101  else {
102    digitalWrite(in1, HIGH); digitalWrite(in2, HIGH);  // Brake
103    digitalWrite(in3, HIGH); digitalWrite(in4, HIGH);
104    Xspeed = 0;
105    analogWrite(PWM1, Xspeed);
106    analogWrite(PWM2, Xspeed);
107  }
108
109  // Direction control
110
111  if (yValue >= 1650){
112    digitalWrite(in5, LOW); digitalWrite(in6, HIGH);
113    Yspeed = map(yValue, 1650, 4095, 0, 255);
114    analogWrite(PWM3, Yspeed);
115  }
116  else if (yValue <= 1630){
117    digitalWrite(in5, HIGH); digitalWrite(in6, LOW);
118    Yspeed = map(yValue, 1630, 0, 0, 255);
119    analogWrite(PWM3, Yspeed);
120  } else {
121    digitalWrite(in5, HIGH); digitalWrite(in6, HIGH);
122    Yspeed = 0;
123    analogWrite(PWM3, Yspeed);
124  }
125
126  Serial.print("Received: "); Serial.print(xValue); Serial.print(","); Serial.println(Xspeed);
127}
Documentation
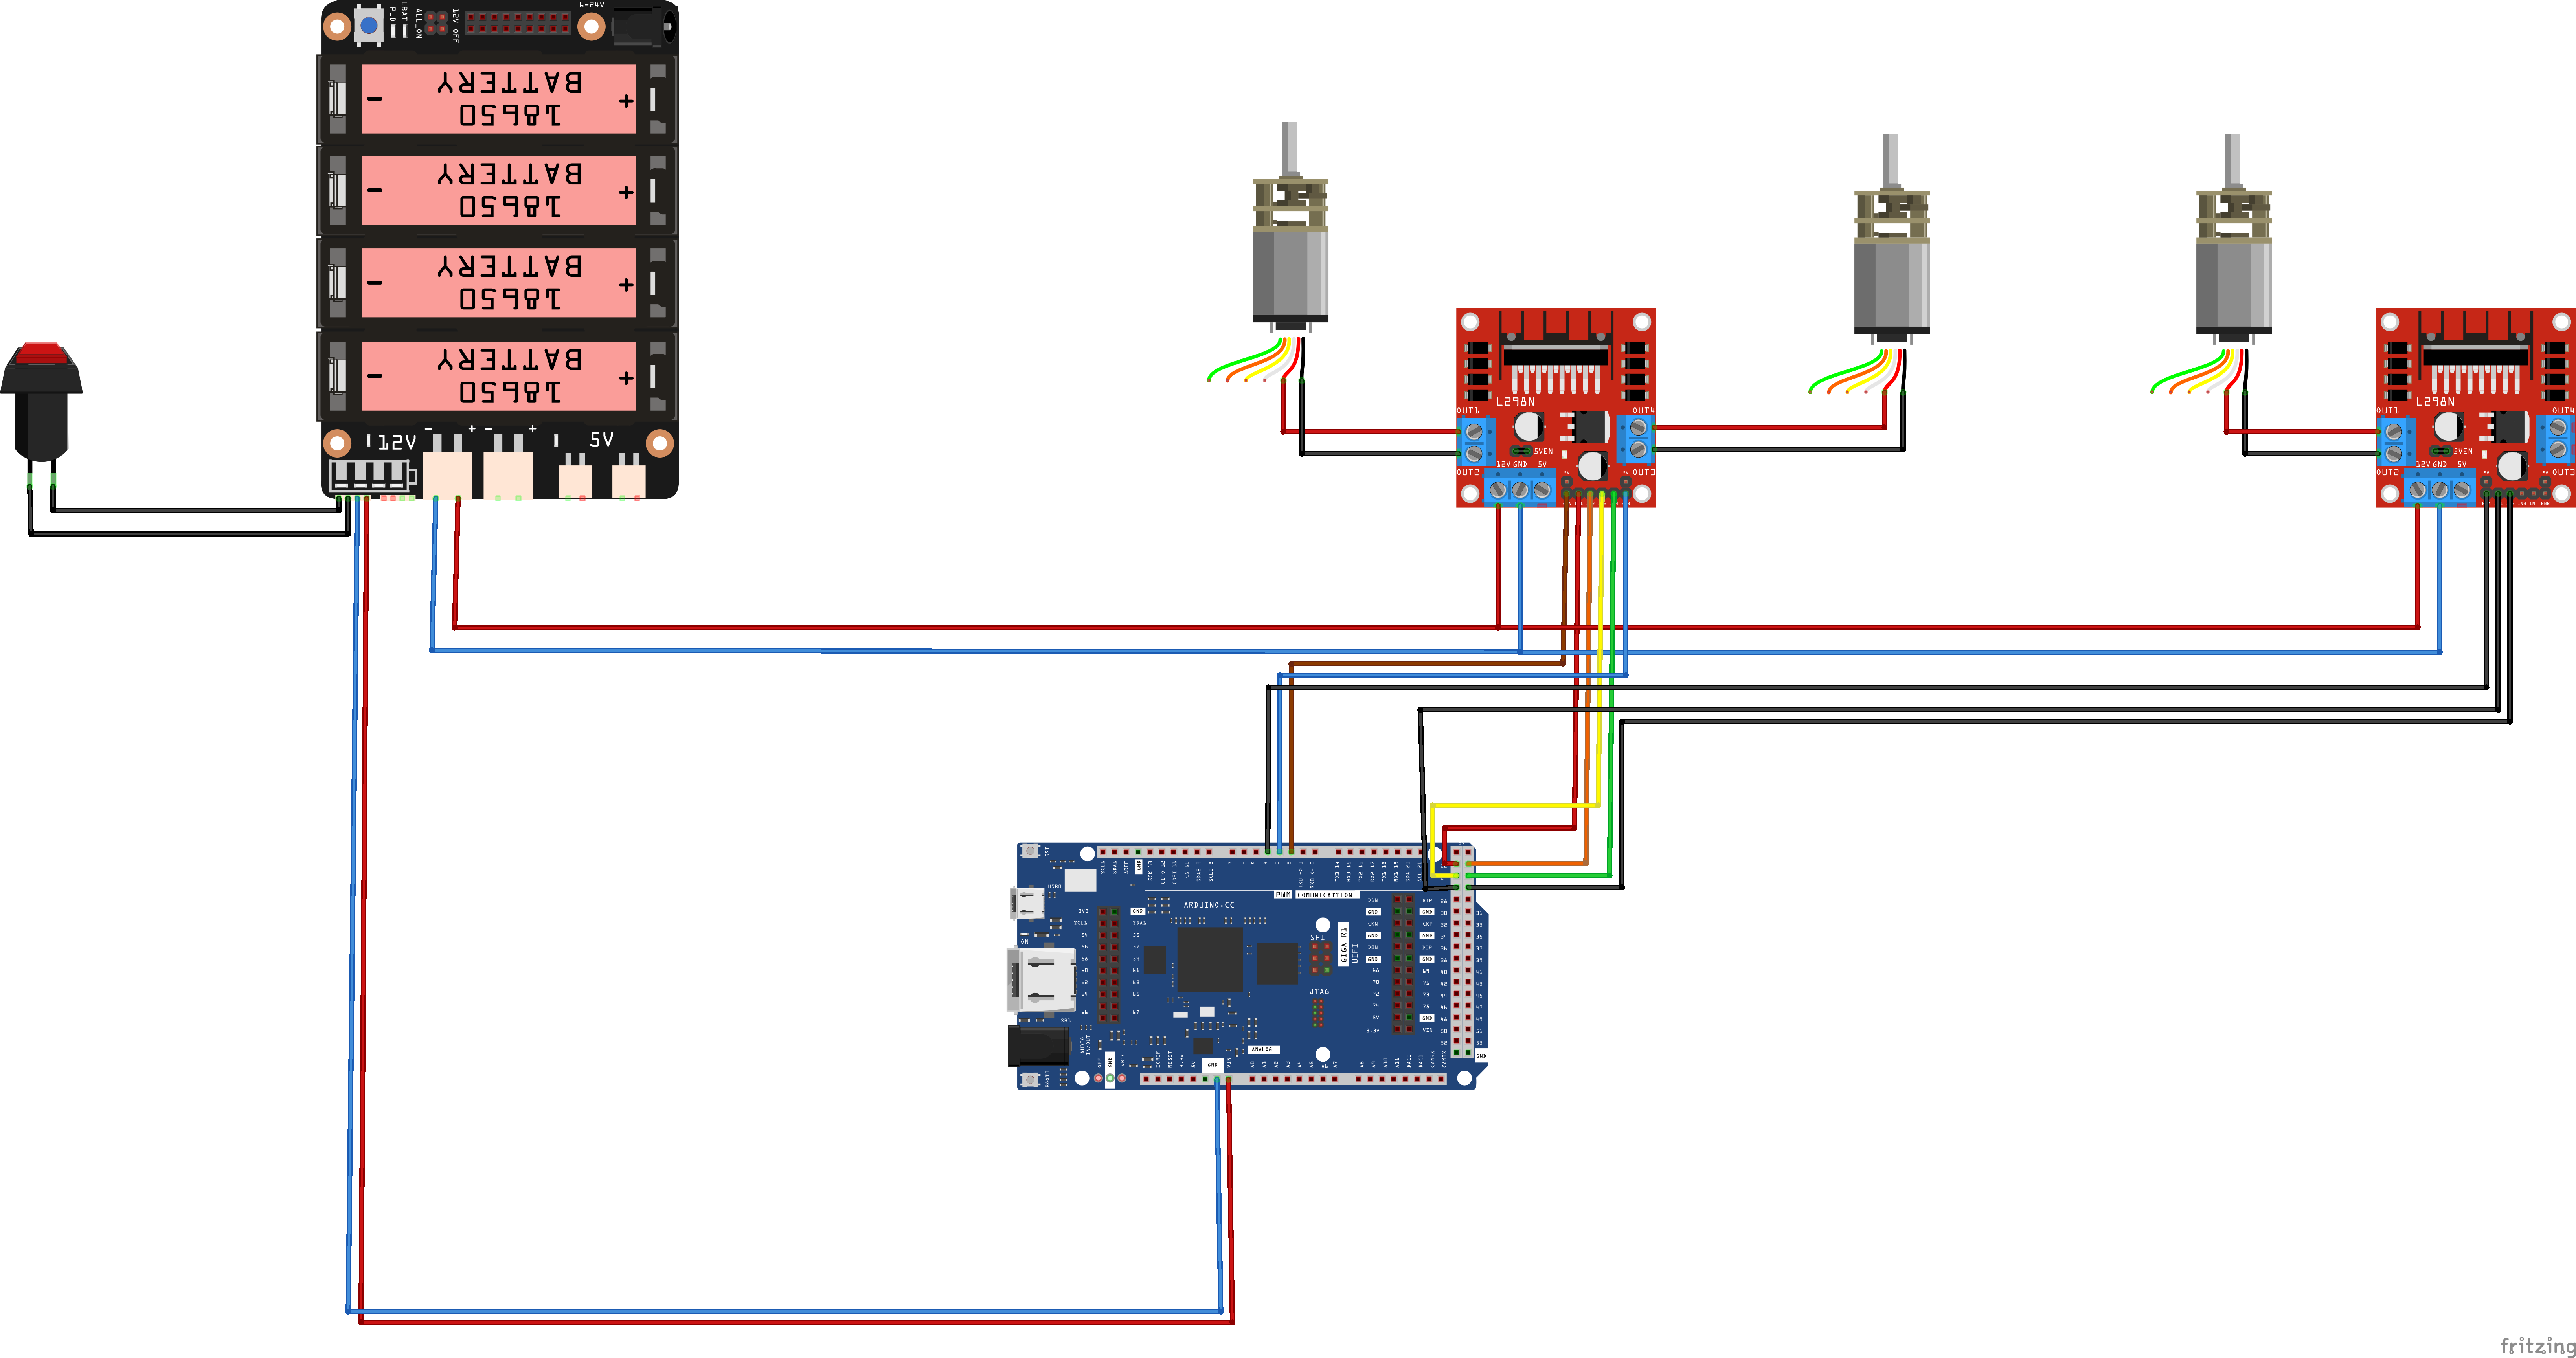
Omnibot Wiring
This is the simple wiring setup for Omnibot.
OmniBot.png
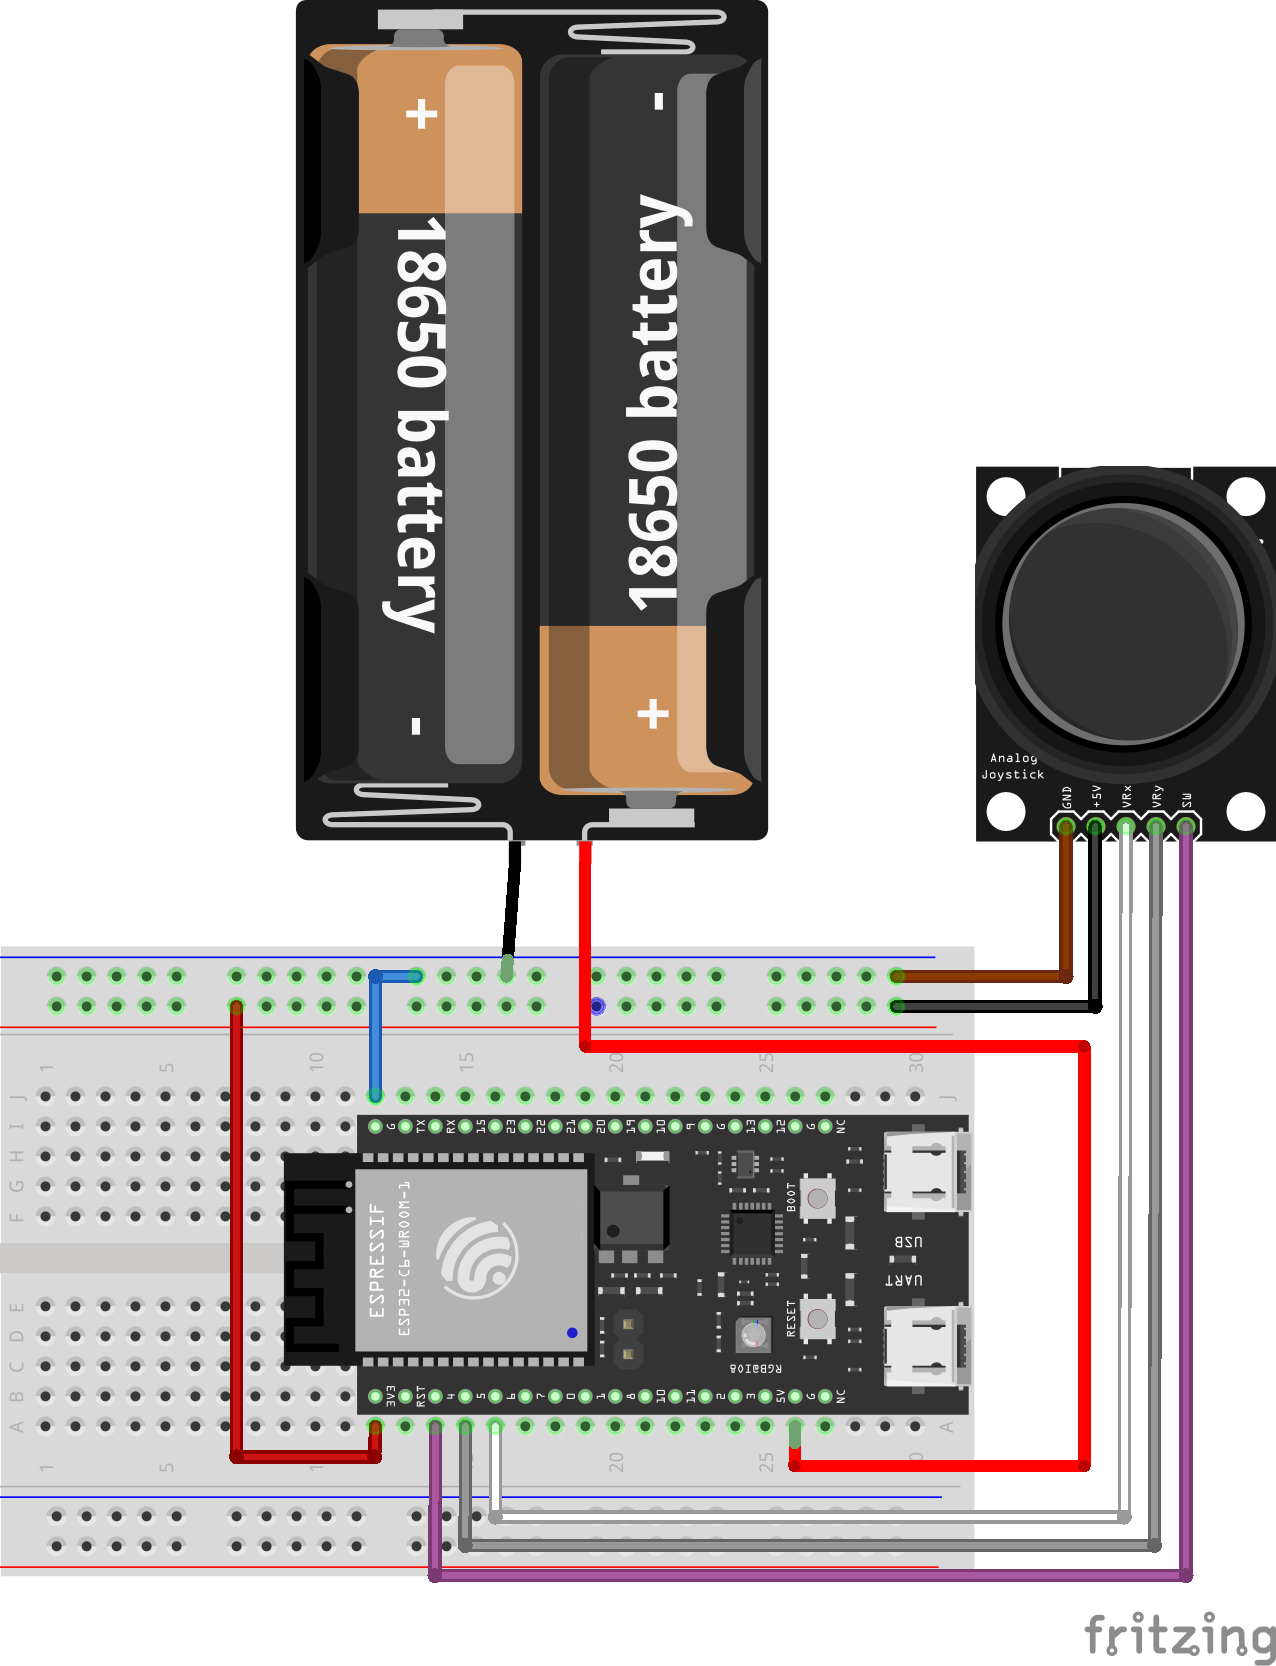
Controller
For power, use 5V pins from the battery shield.
OmniController.png
Comments
Only logged in users can leave comments