Devices & Components
Arduino Uno Rev3
LED, Blue Green
Pushbutton Switch, Momentary
Terminal Block, Header
Resistor 220 ohm
Speaker: 0.25W, 8 ohms
5 mm LED: Red
5 mm LED: Green
Hardware & Tools
Solder Wire, Lead Free
Soldering iron (generic)
Project description
Code
Simon Says
arduino
This code will run the basic Simon game. It starts with 5 tones, advances with each successful run. After beating seven tones, it speeds up, after beating nine tones it speeds up again. Theoretically, at some point the challenge would be long enough to use all available memory, and would break the code. Good luck getting that far!
Downloadable files
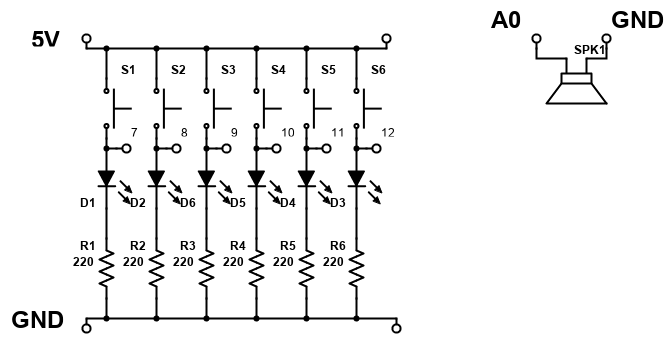
Basic Circuit
The high side of the pushbuttons are all the same node. Wire this to the Arduino 5V pin. Data pins 7 - 12 are connected at the anode of the LEDs, one per channel. The cathode of each LED is connected to a 220 Ohm resistor, which is connected to ground. All six resistors share a common ground. This configuration allows the button to light the led when pressed, or the LEDs can be driven directly from the digital pins on the Arduino.
Basic Circuit
Basic Circuit
The high side of the pushbuttons are all the same node. Wire this to the Arduino 5V pin. Data pins 7 - 12 are connected at the anode of the LEDs, one per channel. The cathode of each LED is connected to a 220 Ohm resistor, which is connected to ground. All six resistors share a common ground. This configuration allows the button to light the led when pressed, or the LEDs can be driven directly from the digital pins on the Arduino.
Basic Circuit
Comments
Only logged in users can leave comments