Clock on Nokia5110 using esp8266
Simple clock using Nokia 5110 display and esp8266 NodeMCU and ntp
Devices & Components
1
Breadboard (generic)
1
Nokia 5110 LCD
1
NodeMCU ESP8266
Project description
Code
Display_Test_online.ino
arduino
Upload to the NodeMCU using the Arduino IDE :: Remembering to fill in your wifi credentials first
1/*
2 * A Simple clock using the Nokia 5110 Screen and the esp8266 NodeMCU
3  * The pins of the display are connected to D1 - D5 (GPIO 14,2 0,4 and 5
4 * CLK,  DIN, D/C, CS, RST respectively)
5 */
6
7#include <ESP8266WiFi.h>
8#include  <NTPClient.h>
9#include <WiFiUdp.h>
10#include <Adafruit_PCD8544.h>  // include  adafruit PCD8544 (Nokia 5110) library
11int currentHour;   //Hour Variable
12int  currentMinute; //Minute Variable
13int currentSecond; //Second Variable
14const  char *ssid  = "********";// Replace with your network credentials
15const char  *password = "********";
16
17
18// Define NTP Client to get time
19WiFiUDP  ntpUDP;
20NTPClient timeClient(ntpUDP, "0.uk.pool.ntp.org");   // This is the  UK time server i used
21
22
23// Nokia 5110 LCD module connections CLK, DIN,  D/C, CS, RST (opposite to the actual pin positions !!)
24Adafruit_PCD8544 display  = Adafruit_PCD8544(14, 2, 0, 4, 5);
25
26
27void setup()   {
28
29  display.begin();
30
31  WiFi.begin(ssid, password);
32  while (WiFi.status() != WL_CONNECTED) {
33    delay(500);
34    }
35  timeClient.begin();
36  timeClient.setTimeOffset(3600); //Add 1 hour  (in seconds) to get BST
37
38  display.setContrast(60);
39  display.clearDisplay();   // clears the screen and buffer
40
41}
42
43void loop() {
44
45  timeClient.update();
46  currentHour = timeClient.getHours();
47  currentMinute = timeClient.getMinutes();
48  currentSecond = timeClient.getSeconds();
49
50
51
52  display.setTextColor(BLACK);
53  display.setTextSize(2);
54  display.setCursor(0,14);
55  if (currentHour <=  9) { //If Hour is single figures, put a 0 in front
56    display.print("0");
57  }
58  display.print(currentHour);
59  display.print(":");
60  if (currentMinute  <= 9) {  //If Minute is single figures, put a 0 in front
61    display.print("0");
62  }
63  display.print(currentMinute);
64  display.print(":");
65  display.setTextSize(1);
66    if (currentSecond <= 9) {  //If Seconds is single figures, put a 0 in front
67    display.print("0");
68  }
69  display.print(currentSecond);
70  display.display();  // Everything is written to a buffer.. so now display on screen
71
72  /*
73   * To clear the screen, i just wrote the same thing to the buffer in white
74   * otherwise the second display would be jumbled with the previous etc
75   */
76
77  display.setTextColor(WHITE);
78  display.setTextSize(2);
79  display.setCursor(0,14);
80    if (currentHour <= 9) {
81    display.print("0");
82  }
83  display.print(currentHour);
84  display.print(":");
85  if (currentMinute <= 9) {
86    display.print("0");
87  }
88  display.print(currentMinute);
89  display.print(":");
90  display.setTextSize(1);
91  if (currentSecond <= 9) {
92    display.print("0");
93  }
94  display.print(currentSecond);
95
96// No need to display the screen again
97}
98
99
Display_Test_online.ino
arduino
Upload to the NodeMCU using the Arduino IDE :: Remembering to fill in your wifi credentials first
1/*
2 * A Simple clock using the Nokia 5110 Screen and the esp8266 NodeMCU
3
4  * The pins of the display are connected to D1 - D5 (GPIO 14,2 0,4 and 5
5 * CLK,
6  DIN, D/C, CS, RST respectively)
7 */
8
9#include <ESP8266WiFi.h>
10#include
11  <NTPClient.h>
12#include <WiFiUdp.h>
13#include <Adafruit_PCD8544.h>  // include
14  adafruit PCD8544 (Nokia 5110) library
15int currentHour;   //Hour Variable
16int
17  currentMinute; //Minute Variable
18int currentSecond; //Second Variable
19const
20  char *ssid  = "********";// Replace with your network credentials
21const char
22  *password = "********";
23
24
25// Define NTP Client to get time
26WiFiUDP
27  ntpUDP;
28NTPClient timeClient(ntpUDP, "0.uk.pool.ntp.org");   // This is the
29  UK time server i used
30
31
32// Nokia 5110 LCD module connections CLK, DIN,
33  D/C, CS, RST (opposite to the actual pin positions !!)
34Adafruit_PCD8544 display
35  = Adafruit_PCD8544(14, 2, 0, 4, 5);
36
37
38void setup()   {
39
40  display.begin();
41
42
43  WiFi.begin(ssid, password);
44  while (WiFi.status() != WL_CONNECTED) {
45    delay(500);
46
47    }
48  timeClient.begin();
49  timeClient.setTimeOffset(3600); //Add 1 hour
50  (in seconds) to get BST
51
52  display.setContrast(60);
53  display.clearDisplay();
54   // clears the screen and buffer
55
56}
57
58void loop() {
59
60  timeClient.update();
61
62  currentHour = timeClient.getHours();
63  currentMinute = timeClient.getMinutes();
64
65  currentSecond = timeClient.getSeconds();
66
67
68
69  display.setTextColor(BLACK);
70
71  display.setTextSize(2);
72  display.setCursor(0,14);
73  if (currentHour <=
74  9) { //If Hour is single figures, put a 0 in front
75    display.print("0");
76
77  }
78  display.print(currentHour);
79  display.print(":");
80  if (currentMinute
81  <= 9) {  //If Minute is single figures, put a 0 in front
82    display.print("0");
83
84  }
85  display.print(currentMinute);
86  display.print(":");
87  display.setTextSize(1);
88
89    if (currentSecond <= 9) {  //If Seconds is single figures, put a 0 in front
90
91    display.print("0");
92  }
93  display.print(currentSecond);
94  display.display();
95  // Everything is written to a buffer.. so now display on screen
96
97  /*
98
99   * To clear the screen, i just wrote the same thing to the buffer in white
100
101   * otherwise the second display would be jumbled with the previous etc
102   */
103
104
105  display.setTextColor(WHITE);
106  display.setTextSize(2);
107  display.setCursor(0,14);
108
109    if (currentHour <= 9) {
110    display.print("0");
111  }
112  display.print(currentHour);
113
114  display.print(":");
115  if (currentMinute <= 9) {
116    display.print("0");
117
118  }
119  display.print(currentMinute);
120  display.print(":");
121  display.setTextSize(1);
122
123  if (currentSecond <= 9) {
124    display.print("0");
125  }
126  display.print(currentSecond);
127
128
129// No need to display the screen again
130}
131
132
Downloadable files
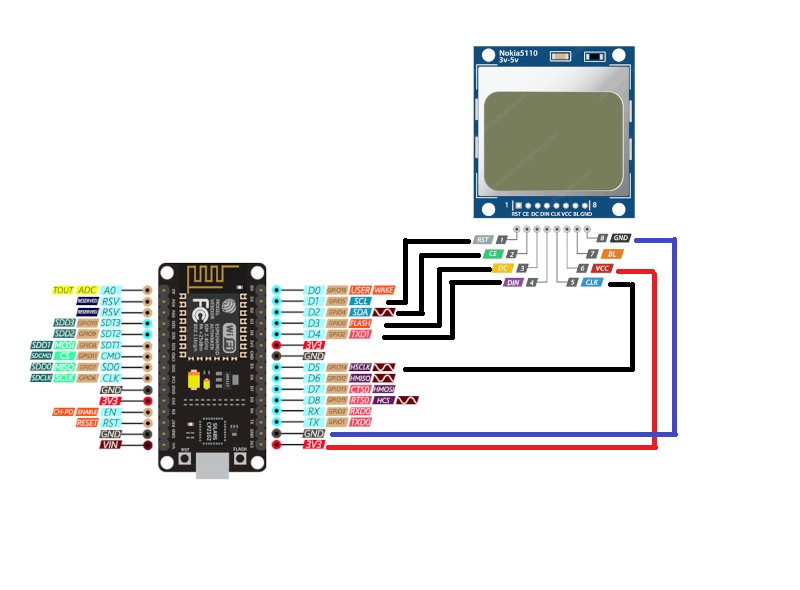
esp8266 connections
Connect as shown or modify to suit
esp8266 connections
Comments
Only logged in users can leave comments