Smart face detection door lock
This project turn disables the door lock for an authorised user by face detection.
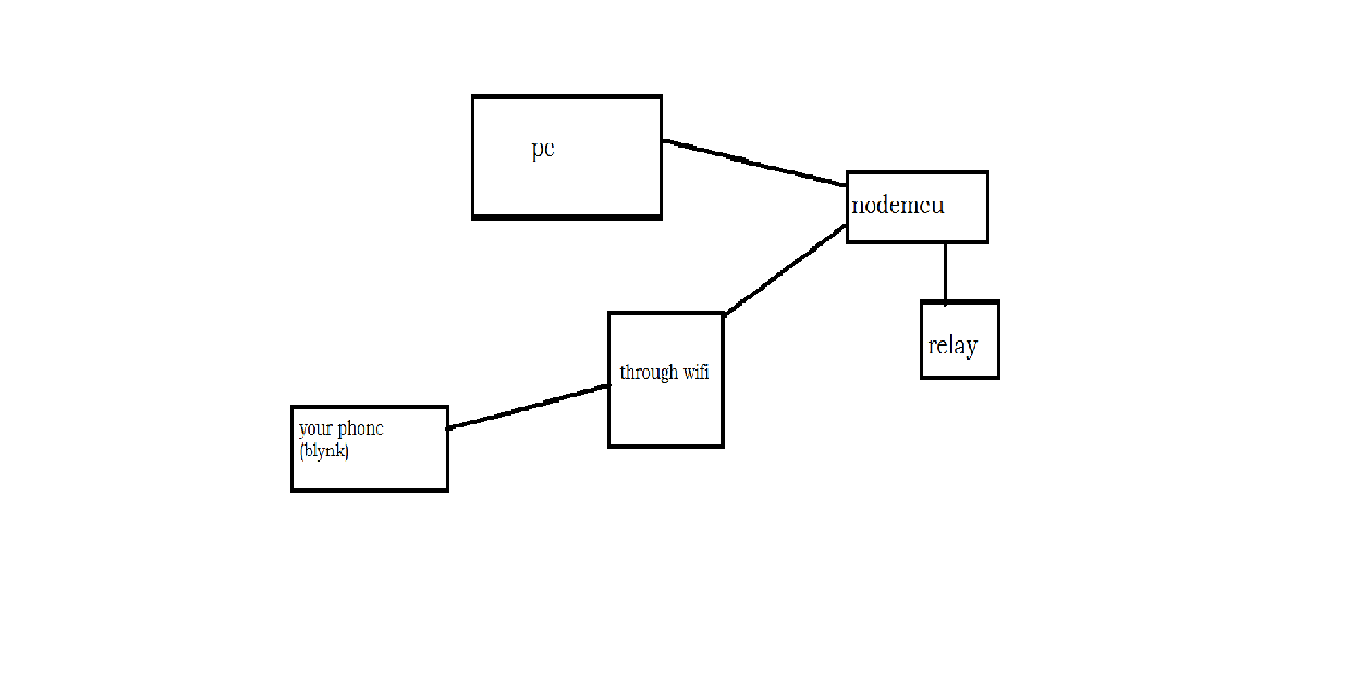
Devices & Components
Relay (generic)
Webcam, Logitech® HD Pro
Raspberry Pi 3 Model B
NodeMCU ESP8266 Breakout Board
Jumper wires (generic)
Software & Tools
Blynk
Arduino IDE
PyCharm
Project description
Code
THIS IS FOR NodeMcu
c_cpp
Please write down somewhere the COM of the nodemcu and uploading speed(usually its 9600) you can check it from serial monitor
1#define relay D2// connect the relay module to the D2 of the nodeMcu
2#define   BLYNK_PRINT Serial
3#include <ESP8266WiFi.h>
4#include <BlynkSimpleEsp8266.h>
5char   auth[] = "";// your authorisation code
6char ssid[] = "";// your wifi name
7char   pass[] = "";// your wifi password
8BlynkTimer timer;
9WidgetTerminal terminal(V1);
10//   You can send commands from Terminal to your hardware. Just use
11// the same Virtual   Pin as your Terminal Widget
12BLYNK_WRITE(V1){
13
14  // if you type "Marco"   into Terminal Widget - it will respond: "Polo:"
15  if (String("Hi") == param.asStr())   {
16    terminal.println("You said: 'Hi'") ;
17    terminal.println("I said:   'Hi'") ;
18  } else {
19
20    // Send it back
21    terminal.print("You said:");
22     terminal.write(param.getBuffer(), param.getLength());
23    terminal.println();
24   }
25
26  // Ensure everything is sent
27  terminal.flush();
28}
29
30int   data;
31void setup() {
32    Serial.begin(9600);
33  Blynk.begin(auth, ssid,   pass);
34  timer.setInterval(1000L, Sensor);
35  pinMode(relay,OUTPUT);
36  terminal.clear();
37}
38void   Sensor(){
39  while(Serial.available()){
40    data = Serial.read();
41  }
42{
43
44  if(data == '1'){
45    terminal.println("Elon Musk has entered");
46     digitalWrite(relay,HIGH);
47    delay(5000);
48    digitalWrite(relay,LOW);
49   }else if(data == '2'){
50    terminal.println("Barack Obama has entered");
51     digitalWrite(relay,HIGH);
52    delay(5000);
53    digitalWrite(relay,LOW);
54
55  }else if(data == '3'){
56    terminal.println("Joe Biden has entered");
57     digitalWrite(relay,HIGH);
58    delay(5000);
59    digitalWrite(relay,LOW);
60    }
61    terminal.flush();
62
63}
64}
65void loop() {
66   Blynk.run();
67   timer.run();
68}
THIS IS FOR NodeMcu
c_cpp
Please write down somewhere the COM of the nodemcu and uploading speed(usually its 9600) you can check it from serial monitor
1#define relay D2// connect the relay module to the D2 of the nodeMcu
2#define  BLYNK_PRINT Serial
3#include <ESP8266WiFi.h>
4#include <BlynkSimpleEsp8266.h>
5char  auth[] = "";// your authorisation code
6char ssid[] = "";// your wifi name
7char  pass[] = "";// your wifi password
8BlynkTimer timer;
9WidgetTerminal terminal(V1);
10//  You can send commands from Terminal to your hardware. Just use
11// the same Virtual  Pin as your Terminal Widget
12BLYNK_WRITE(V1){
13
14  // if you type "Marco"  into Terminal Widget - it will respond: "Polo:"
15  if (String("Hi") == param.asStr())  {
16    terminal.println("You said: 'Hi'") ;
17    terminal.println("I said:  'Hi'") ;
18  } else {
19
20    // Send it back
21    terminal.print("You said:");
22    terminal.write(param.getBuffer(), param.getLength());
23    terminal.println();
24  }
25
26  // Ensure everything is sent
27  terminal.flush();
28}
29
30int  data;
31void setup() {
32    Serial.begin(9600);
33  Blynk.begin(auth, ssid,  pass);
34  timer.setInterval(1000L, Sensor);
35  pinMode(relay,OUTPUT);
36  terminal.clear();
37}
38void  Sensor(){
39  while(Serial.available()){
40    data = Serial.read();
41  }
42{
43
44  if(data == '1'){
45    terminal.println("Elon Musk has entered");
46    digitalWrite(relay,HIGH);
47    delay(5000);
48    digitalWrite(relay,LOW);
49  }else if(data == '2'){
50    terminal.println("Barack Obama has entered");
51    digitalWrite(relay,HIGH);
52    delay(5000);
53    digitalWrite(relay,LOW);
54
55  }else if(data == '3'){
56    terminal.println("Joe Biden has entered");
57    digitalWrite(relay,HIGH);
58    delay(5000);
59    digitalWrite(relay,LOW);
60   }
61    terminal.flush();
62
63}
64}
65void loop() {
66   Blynk.run();
67  timer.run();
68}
This is for Pycharm or other IDEs
python
IMPORTANT POINTS:- 1) take the pic of the people you want to give access and paste it to the python project file 2) write the com and uploading speed on the line 6 3) dont forget to install all the libraries you may have to install dlib too
1import face_recognition
2import cv2
3import numpy as np
4import  pyttsx3
5import serial
6ser = serial.Serial('com3', 9600)
7
8# This is a  demo of running face recognition on live video from your webcam. It's a little more  complicated than the
9# other example, but it includes some basic performance  tweaks to make things run a lot faster:
10#   1. Process each video frame at 1/4  resolution (though still display it at full resolution)
11#   2. Only detect faces  in every other frame of video.
12
13# PLEASE NOTE: This example requires OpenCV  (the `cv2` library) to be installed only to read from your webcam.
14# OpenCV is  *not* required to use the face_recognition library. It's only required if you want  to run this
15# specific demo. If you have trouble installing it, try any of the  other demos that don't require it instead.
16
17# Get a reference to webcam #0  (the default one)
18video_capture = cv2.VideoCapture(0)
19
20# Load a sample  picture and learn how to recognize it.
21obama_image = face_recognition.load_image_file("obama.jpg")
22obama_face_encoding  = face_recognition.face_encodings(obama_image)[0]
23
24# Load a second sample  picture and learn how to recognize it.
25biden_image = face_recognition.load_image_file("biden.jpg")
26biden_face_encoding  = face_recognition.face_encodings(biden_image)[0]
27
28elon_image = face_recognition.load_image_file("Elon_Musk_2015.jpg")
29elon_face_encoding  = face_recognition.face_encodings(elon_image)[0]
30
31# Create arrays of known  face encodings and their names
32known_face_encodings = [
33    obama_face_encoding,
34    biden_face_encoding,
35    elon_face_encoding
36]
37known_face_names = [
38    "Obama",
39    "Biden",
40    "Elon Musk"
41]
42
43# Initialize some  variables
44face_locations = []
45face_encodings = []
46face_names = []
47process_this_frame  = True
48engine = pyttsx3.init()
49
50
51def talk(text):
52    engine.say(text)
53    engine.runAndWait()
54
55
56while True:
57    # Grab a single frame of video
58    ret, frame = video_capture.read()
59
60    # Resize frame of video to 1/4  size for faster face recognition processing
61    small_frame = cv2.resize(frame,  (0, 0), fx=0.25, fy=0.25)
62
63    # Convert the image from BGR color (which OpenCV  uses) to RGB color (which face_recognition uses)
64    rgb_small_frame = small_frame[:,  :, ::-1]
65
66    # Only process every other frame of video to save time
67    if  process_this_frame:
68        # Find all the faces and face encodings in the current  frame of video
69        face_locations = face_recognition.face_locations(rgb_small_frame)
70        face_encodings = face_recognition.face_encodings(rgb_small_frame, face_locations)
71
72        face_names = []
73        for face_encoding in face_encodings:
74            #  See if the face is a match for the known face(s)
75            matches = face_recognition.compare_faces(known_face_encodings,  face_encoding)
76            name = unk
77
78            # # If a match was found  in known_face_encodings, just use the first one.
79            # if True in matches:
80            #     first_match_index = matches.index(True)
81            #     name  = known_face_names[first_match_index]
82
83            # Or instead, use the known  face with the smallest distance to the new face
84            face_distances =  face_recognition.face_distance(known_face_encodings, face_encoding)
85            best_match_index  = np.argmin(face_distances)
86            if matches[best_match_index]:
87                name  = known_face_names[best_match_index]
88                if name == "Elon Musk":
89                    print(1)
90                    val = "1"
91                    ser.write(str.encode(val))
92                    talk("Welcome, Elon Musk")
93                elif name ==  "Obama":
94                    print(2)
95                    val = "2"
96                    ser.write(str.encode(val))
97                    talk("Welcome,  Obama")
98                elif name == "Biden":
99                    print(3)
100                    val = "3"
101                    ser.write(str.encode(val))
102                    talk("Welcome, Biden")
103
104            face_names.append(name)
105
106    process_this_frame = not process_this_frame
107
108    # Display the results
109    for (top, right, bottom, left), name in zip(face_locations, face_names):
110        # Scale back up face locations since the frame we detected in was scaled  to 1/4 size
111        top *= 4
112        right *= 4
113        bottom *= 4
114        left *= 4
115
116        # Draw a box around the face
117        cv2.rectangle(frame,  (left, top), (right, bottom), (0, 0, 255), 2)
118
119        # Draw a label with  a name below the face
120        cv2.rectangle(frame, (left, bottom - 35), (right,  bottom), (0, 0, 255), cv2.FILLED)
121        font = cv2.FONT_ITALIC
122        cv2.putText(frame,  name, (left + 6, bottom - 6), font, 1.0, (0, 0, 0), 1)
123
124    # Display the  resulting image
125    cv2.imshow('Video', frame)
126
127    # Hit 'q' on the keyboard  to quit!
128    if cv2.waitKey(1) & 0xFF == ord('q'):
129        break
130
131#  Release handle to the webcam
132video_capture.release()
133cv2.destroyAllWindows()
134
Downloadable files
diagram
diagram
diagram
diagram
Comments
Only logged in users can leave comments