Simple Arduino Solar Radiation Meter for Solar Panels
Simple to make, but extremely useful instrument, especially when designing solar systems.
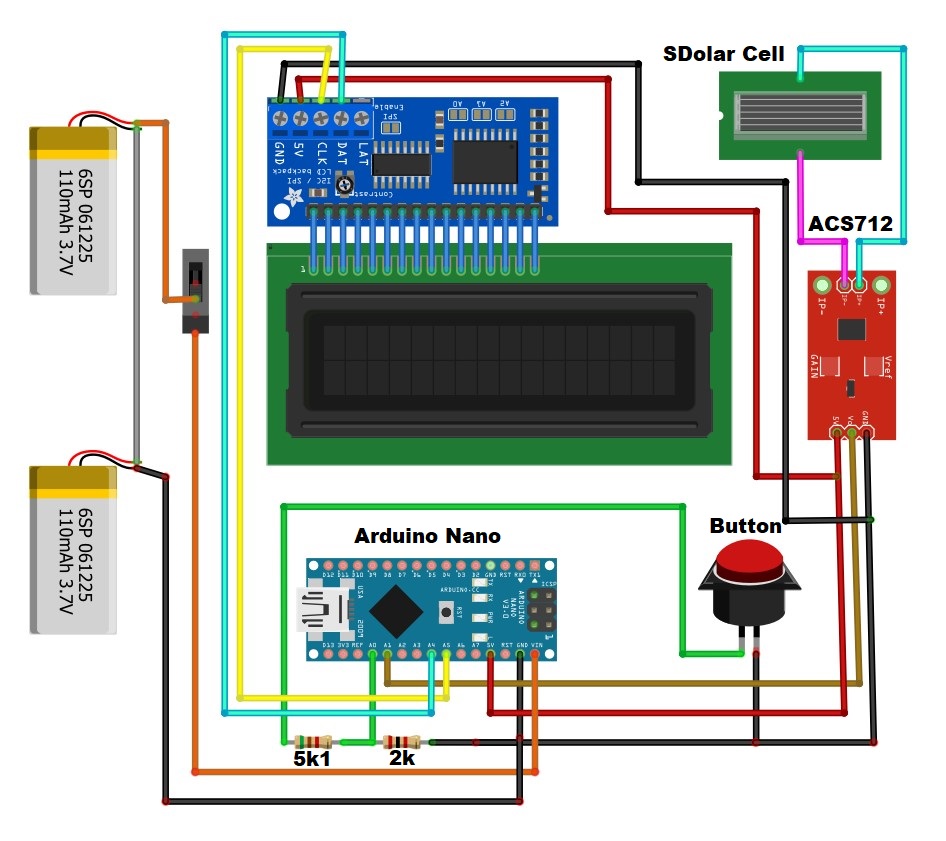
Devices & Components
1
Arduino Nano
1
16x2 LCD display with I²C interface
1
Resistor 5k ohm
1
Resistor 2k ohm
1
Mini encapsulated solar cell 0.5V 800mA
1
CURRENT SENSOR ACS712
1
Push Button
Hardware & Tools
1
Soldering kit
Software & Tools
Arduino IDE
Project description
Code
Code Solar Meter
cpp
...
1/* Irradiation meter using Solar Cell by Solarduino */
2
3// Note :  Safety is very important when dealing with electricity. We take no responsibilities while you do it at your own risk.
4// Note :  Irradiation meter is designed to measure and record the irradiation level for PV system performance check and feasibility study.
5// Note :  Irradiation can measure and record (in SD card) instantaneous short circuit current (Isc) of panel, instantaneous Irradiation (W/m2) and daily Irradiation Energy in (W/m2/day)
6// Note :  The daily Irradiation Energy is reset everyday or reset upon power outage (power supply to Arduino).
7// Note :  The accuracy of the Irradiation is subject to the quality of user's solar cell and current module sensor.
8// Note :  The Short Circuit Current of panel is recommended to be slightly lower or near the maximum range of current sensor for better accuracy results.
9// Note :  The Irradiation is 100% subject to measured current and temperature coeffecient is neglected as it has almost negligible effect
10// Note :  The temperature coefficient is neglected so that do not need additional temperature probe, furthermore 65 degree celcius under hot sun (40 degree temperature diference from STC) only performing 2.5% difference.
11// Note :  The unit provides reasonable accuracy and may not be comparable with other expensive branded and commercial irradiation meter.
12// Note :  All credit shall be given to Solarduino.
13
14/*/////////////////////////////////////////////////////////////////////////////////////////////////////////////////////////////////////////////////////////////////////////////////////*/
15
16
17        /* 0- General */
18
19        int decimalPrecision = 2;                   /* decimal places for only for current value shown in LED Display */
20
21        /* 1- DC Current & Irradiation */
22
23        int CurrentAnalogInputPin = A1;             // Which pin to measure Current Value
24        float mVperAmpValue = 185;                  // If using ACS712 current module : for 5A module key in 185, for 20A module key in 100, for 30A module key in 66
25                                                    // If using WCS current module : for 0.25A module key in 7000, for 0.5A module key in 3500, for 1.0A module key in 2000, for 2.0A module key in 1000.
26        float moduleMiddleVoltage = 2500;           // key in middle voltage value in mV. For 5V power supply key in 2500, for 3.3V power supply, key in 1650 mV
27        float moduleSupplyVoltage = 5000;           // supply voltage to current sensor module in mV, default 5000mV, may use 3300mV
28        float currentSampleRead  = 0;               /* to read the value of a sample*/
29        float currentLastSample  = 0;               /* to count time for each sample. Technically 1 milli second 1 sample is taken */
30        float currentSampleSum   = 0;               /* accumulation of sample readings */
31        float currentSampleCount = 0;               /* to count number of sample. */
32        float currentMean ;                         /* to calculate the average value from all samples*/
33        float finalCurrent ;                        /* the final current reading without taking offset value*/
34        float finalCurrent2 ;                       /* the final current reading*/
35        float ShortCircuitCurrentSTC = 1.2   ;      // Key in the Short Circuit Current (At STC condition) of your Solar Panel or Solar Cell. Value 9 showing 9.0A Isc Panel.
36        float Irradiation = 0.00;                   /* This shows the irradiation level in W/m2.
37
38            /* 1.1 - Offset DC Current */
39            int   OffsetRead = 0;                   /* To switch between functions for auto callibation purpose */
40            float currentOffset =0.00;              // to Offset deviation and accuracy. Offset any fake current when no current operates.
41                                                    // the offset will automatically done when you press the <SELECT> button on the LCD display module.
42                                                    // you may manually set offset here if you do not have LCD shield
43            float offsetLastSample = 0;             /* to count time for each sample. Technically 1 milli second 1 sample is taken */
44            float offsetSampleCount = 0;            /* to count number of sample. */
45
46            /* 1.2 - Average Accumulate Irradiation */
47
48            float accumulateIrradiation = 0;                          /* Amount of accumulate irradiation*/
49            unsigned long startMillisIrradiation;                     /* start counting time for irradiation energy */
50            unsigned long currentMillisIrradiation;                   /* current counting time for irradiation energy */
51            const unsigned long periodIrradiation = 1000;             // refresh every X seconds (in seconds) Default 1000 = 1 second
52            float FinalAccumulateIrradiationValue = 0;                /* shows the final accumulate irradiation reading*/
53
54
55        /* 2 - LCD Display  */
56
57    //    #include<LiquidCrystal.h>                                   /*Load the liquid Crystal Library (by default already built-it with arduino solftware)*/
58    //   LiquidCrystal LCD(8,9,4,5,6,7);                             /*Creating the LiquidCrystal object named LCD */
59
60       #include <Wire.h>
61
62       #include <LiquidCrystal_I2C.h>
63       LiquidCrystal_I2C LCD(0x27, 16, 2);
64
65
66
67        unsigned long startMillisLCD;                               /* start counting time for LCD Display */
68        unsigned long currentMillisLCD;                             /* current counting time for LCD Display */
69        const unsigned long periodLCD = 1000;                       // refresh every X seconds (in seconds) in LED Display. Default 1000 = 1 second
70
71
72void setup()
73
74{
75
76        /* 0- General */
77
78        Serial.begin(9600);                               /* In order to see value in serial monitor */
79
80        /* 1.2 - Average Accumulate Irradiation */
81
82        startMillisIrradiation = millis();                /* Record initial starting time for daily irradiation */
83
84        /* 2 - LCD Display  */
85
86        LCD.begin(16,2);                                  /* Tell Arduino that our LCD has 16 columns and 2 rows*/
87        LCD.backlight();
88        LCD.clear();
89        LCD.setCursor(5, 0);
90        LCD.print("ARDUINO");
91        LCD.setCursor(2, 1);
92        LCD.print("IRRAD. METER");
93        delay(3000);                             /* Set LCD to upper left corner to start display*/
94
95        startMillisLCD = millis();                        /* Record initial starting time for LCD Display refresh rate. */
96
97}
98
99void loop()
100
101{
102
103  /* 0.1- Button Function */
104
105              int buttonRead;
106              buttonRead = analogRead (0);                                    // Read analog pin A0. By default the LCD Display shield already assigned A0 as button function. Cannot change.
107
108           if (buttonRead < 800)
109              {
110              OffsetRead = 1;                                                 // to activate offset when button <SELECT> is pressed
111              LCD.setCursor(0,0);
112              LCD.print ("INITIALIZING..... ");
113              LCD.setCursor(0,1);
114              LCD.print ("WAIT 5 SEC ..... ");
115             // delay(2000);
116              }
117
118
119
120  /* 1- DC Current & Irradiation */
121
122        if(millis() >= currentLastSample + 1 )                                                                /* every 1 milli second taking 1 reading */
123          {
124            currentSampleRead = analogRead(CurrentAnalogInputPin)-((moduleMiddleVoltage/moduleSupplyVoltage)*1024);      /* read the sample value */
125            currentSampleSum = currentSampleSum + currentSampleRead ;                                         /* accumulate value with older sample readings*/
126            currentSampleCount = currentSampleCount + 1;                                                      /* to move on to the next following count */
127            currentLastSample = millis();                                                                     /* to reset the time again so that next cycle can start again*/
128          }
129
130        if(currentSampleCount == 1000)                                                                        /* after 1000 count or 1000 milli seconds (1 second), do the calculation and display value*/
131          {
132            currentMean = currentSampleSum/currentSampleCount;                                                /* calculate average value of all sample readings taken*/
133            finalCurrent = (((currentMean /1024)*moduleSupplyVoltage)/mVperAmpValue);                         /* calculate the final current (without offset)*/
134            finalCurrent2 = finalCurrent+currentOffset;                                                       /* The final current */
135            Irradiation = (finalCurrent2/ShortCircuitCurrentSTC*1000);
136            Serial.print(finalCurrent2,decimalPrecision);
137            Serial.print(" A  ");
138            Serial.print(Irradiation,decimalPrecision);
139            Serial.print(" W/m2  ");
140            currentSampleSum =0;                                                                              /* to reset accumulate sample values for the next cycle */
141            currentSampleCount=0;                                                                             /* to reset number of sample for the next cycle */
142          }
143
144
145            /* 1.1 - Offset DC Current */
146
147            if(OffsetRead == 1)
148              {
149                currentOffset = 0;                                                             /* set back currentOffset as default first*/
150                if(millis() >= offsetLastSample + 1)                                           /* offset 1 - to centralise analogRead waveform*/
151                  {
152                    offsetSampleCount = offsetSampleCount + 1;
153                    offsetLastSample = millis();
154                  }
155
156                   if(offsetSampleCount == 2500)                                             /* need to wait awhile as to get new value before offset take into calculation.  */
157                {                                                                             /* So this code is to delay 2.5 seconds after button pressed */
158                  currentOffset = - finalCurrent;                                             /* to offset values */
159                  OffsetRead = 0;                                                             /* until next offset button is pressed*/
160                  offsetSampleCount = 0;                                                      /* to reset the time again so that next cycle can start again */
161                  LCD.setCursor(0,0);
162                  LCD.print ("OFFSET.....     ");
163                  LCD.setCursor(0,1);
164                  LCD.print ("DONE  .....     ");
165                  delay(1000);
166                }
167            }
168
169
170         /* 1.2 - Average Accumulate Irradiation */
171
172         currentMillisIrradiation = millis();                                                                 /* Count the time for current */
173
174        if (currentMillisIrradiation - startMillisIrradiation >= periodIrradiation)
175        {
176            accumulateIrradiation = Irradiation/3600*(periodIrradiation/1000);                                /* for smoothing calculation*/
177            FinalAccumulateIrradiationValue =  FinalAccumulateIrradiationValue + accumulateIrradiation ;
178            Serial.print(FinalAccumulateIrradiationValue,decimalPrecision);
179            Serial.println(" Wh/m2/day");
180            startMillisIrradiation = currentMillisIrradiation ;                                               /* Set the starting point again for next counting time */
181        }
182
183
184        /* 2 - LCD Display  */
185
186        currentMillisLCD = millis();
187        if (currentMillisLCD - startMillisLCD >= periodLCD)
188          {
189            LCD.setCursor(0,0);                                                                           /* Set cursor to first colum 0 and second row 1  */
190            LCD.print(finalCurrent2,decimalPrecision);                                                    /* display voltage value in LCD in first row  */
191            LCD.print(" A   ");
192            LCD.setCursor(8,0);
193            LCD.print(Irradiation,0);                                                                     /* display current value in LCD in first row */
194            LCD.print(" W/m2   ");
195            LCD.setCursor(0,1);
196            LCD.print(FinalAccumulateIrradiationValue,0);                                                 /* display current value in LCD in first row */
197            LCD.print("  Wh/m2   ");
198            startMillisLCD = currentMillisLCD ;                                                           /* Set the starting point again for next counting time */
199          }
200}
Downloadable files
Schematic
....
Schematic.jpg
Comments
Only logged in users can leave comments