Devices & Components
Arduino Nano
M2,5 Nuts
SG90 Micro-servo motor
Red LED
M2,5 threaded rod (2x 60mm, 2x 35mm, 1x 40mm)
Dual axis Joystick
Jumper Wire
1,5mm² metal rod (110mm long)
Resistor 10k
Coupler for driveshaft (2mm² on 2mm²)
Servomotor Screws
M2,5 x 8 screws for Motor mount
nRF24 Module (Generic)
7.4 V LiPo Battery
Arduino UNO Mini Limited Edition
4500KV Brushless motor with 25A ESC (BEC)
2mm² metal rod (85mm long)
9V Battery with clip
Hardware & Tools
Soldering kit
3D Printer (generic)
Software & Tools
Arduino IDE
Project description
Code
One way: Transmitter
For Transmitter, without battery status
1#include <SPI.h> 2#include <nRF24L01.h> 3#include <RF24.h> 4 5const uint64_t pipeOut = 0xE8E8F0F0E1LL; 6RF24 radio(7, 8); // CN and CSN pins of nrf 7 8#define VRX_PIN A5 // Arduino pin connected to VRX pin 9#define VRY_PIN A3 // Arduino pin connected to VRY pin 10 11struct MyData { 12 byte xValue; 13 byte yValue; 14}; 15 16MyData data; 17 18void setup() 19{ 20 Serial.begin(9600); 21 radio.begin(); 22 radio.setAutoAck(false); 23 radio.setDataRate(RF24_250KBPS); 24 radio.openWritingPipe(pipeOut); 25} 26void loop() 27{ 28 29 data.xValue = map(analogRead(VRX_PIN), 0, 1023, 0, 180); // Convert the analog read value from 0 to 1023 into a BYTE value from 0 to 255 30 data.yValue = map(analogRead(VRY_PIN), 0, 1023, 0, 180); // Convert the analog read value from 0 to 1023 into a BYTE value from 0 to 255 31 32 Serial.print("X: "); 33 Serial.print(data.xValue); 34 Serial.print("Y: "); 35 Serial.println(data.yValue); 36 radio.write(&data, sizeof(MyData)); 37}
Bidirectional Communication: Receiver
This Code is for the receiver
1#include <SPI.h> 2#include <nRF24L01.h> 3#include <RF24.h> 4#include <Servo.h> 5 6RF24 radio(7, 8); // CE, CSN 7const byte addresses[][6] = {"00001", "00002"}; 8 9Servo ESC; // create servo object to control the ESC 10Servo myservo; // create servo object to control the servo 11 12#define batteryPin A0 13 14int batteryValue = 767; 15boolean lowBattery = 0; 16 17struct MyData { 18 byte xValue; 19 byte yValue; 20}; 21 22MyData data; 23 24 25void setup() { 26 Serial.begin(9600); 27 28 ESC.attach(6, 1000, 2000); // (pin, min pulse width, max pulse width in microseconds) 29 myservo.attach(5); // attaches the servo on pin 4 to the servo object 30 31 radio.begin(); 32 radio.openWritingPipe(addresses[0]); // 00001 33 radio.openReadingPipe(1, addresses[1]); // 00002 34 radio.setPALevel(RF24_PA_MIN); 35} 36 37 38void loop() { 39 delay(5); 40 radio.startListening(); 41 42 if ( radio.available() ) { 43 radio.read(&data, sizeof(MyData)); 44 45 myservo.write(data.xValue);// sets the servo position according to the scaled value 46 ESC.write(data.yValue);// sets the servo position according to the scaled value 47 } 48 Serial.print("X: "); 49 Serial.print(data.xValue); 50 Serial.print("Y: "); 51 Serial.println(data.yValue); 52 53 54 delay(5); 55 radio.stopListening(); 56 batteryValue = analogRead(batteryPin); 57 if (batteryValue <= 767) { 58 lowBattery = HIGH; 59 } 60 else { 61 lowBattery = LOW; 62 } 63 Serial.println(batteryValue); 64 Serial.println(lowBattery); 65 radio.write(&lowBattery, sizeof(lowBattery)); 66}
One way: Receiver
For Receiver, without battery status
1#include <SPI.h> 2#include <nRF24L01.h> 3#include <RF24.h> 4#include <Servo.h> 5 6Servo ESC; // create servo object to control the ESC 7Servo myservo; // create servo object to control the servo 8 9const uint64_t pipeIn = 0xE8E8F0F0E1LL; 10RF24 radio(7, 8); 11 12struct MyData { 13 byte xValue; 14 byte yValue; 15}; 16 17MyData data; 18 19void setup() 20{ 21 Serial.begin(9600); 22 // Attach the ESC on pin 5 23 ESC.attach(6, 1000, 2000); // (pin, min pulse width, max pulse width in microseconds) 24 myservo.attach(5); // attaches the servo on pin 4 to the servo object 25 26 radio.begin(); 27 radio.setAutoAck(false); 28 radio.setDataRate(RF24_250KBPS); 29 radio.openReadingPipe(1, pipeIn); 30 radio.startListening(); 31} 32 33void loop() 34{ 35 if ( radio.available() ) { 36 radio.read(&data, sizeof(MyData)); 37 38 myservo.write(data.xValue);// sets the servo position according to the scaled value 39 ESC.write(data.yValue);// sets the servo position according to the scaled value 40 } 41 Serial.print("X: "); 42 Serial.print(data.xValue); 43 Serial.print("Y: "); 44 Serial.println(data.yValue); 45}
Bidirectional Communication: Transmitter
This Code is for the transmitter
1#include <SPI.h> 2#include <nRF24L01.h> 3#include <RF24.h> 4 5RF24 radio(7, 8); // CE, CSN 6const byte addresses[][6] = {"00001", "00002"}; 7 8#define VRX_PIN A5 // Arduino pin connected to VRX pin 9#define VRY_PIN A3 // Arduino pin connected to VRY pin 10#define ledPin 3 11 12boolean lowBattery = 0; 13 14struct MyData { 15 byte xValue; 16 byte yValue; 17}; 18 19MyData data; 20 21 22void setup() { 23 Serial.begin(9600); 24 pinMode(3, OUTPUT); 25 26 radio.begin(); 27 radio.openWritingPipe(addresses[1]); // 00002 28 radio.openReadingPipe(1, addresses[0]); // 00001 29 radio.setPALevel(RF24_PA_MIN); 30} 31 32 33void loop() { 34 delay(5); 35 radio.stopListening(); 36 37 data.xValue = map(analogRead(VRX_PIN), 0, 1023, 25, 180); // Convert the analog read value from 0 to 1023 into a BYTE value from 0 to 255 38 data.yValue = map(analogRead(VRY_PIN), 0, 1023, 0, 180); // Convert the analog read value from 0 to 1023 into a BYTE value from 0 to 255 39 radio.write(&data, sizeof(MyData)); 40 41 Serial.print("X: "); 42 Serial.print(data.xValue); 43 Serial.print("Y: "); 44 Serial.println(data.yValue); 45 46 47 delay(5); 48 radio.startListening(); 49 Serial.println(lowBattery); 50 while (!radio.available()); 51 radio.read(&lowBattery, sizeof(lowBattery)); 52 if (lowBattery == HIGH) { 53 digitalWrite(ledPin, HIGH); 54 } 55 else { 56 digitalWrite(ledPin, LOW); 57 } 58}
Downloadable files
transmitter files
If You also want to use my transmitter
https://www.thingiverse.com/thing:5823549
3D-printable boat files
Download and print for the boat.
https://www.thingiverse.com/thing:5823509
Documentation
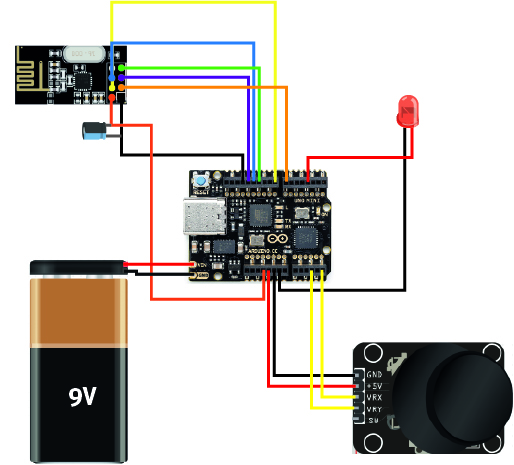
Transmitter schematic
This is the wiring for the transmitter.
Schematic_transmitter.jpg
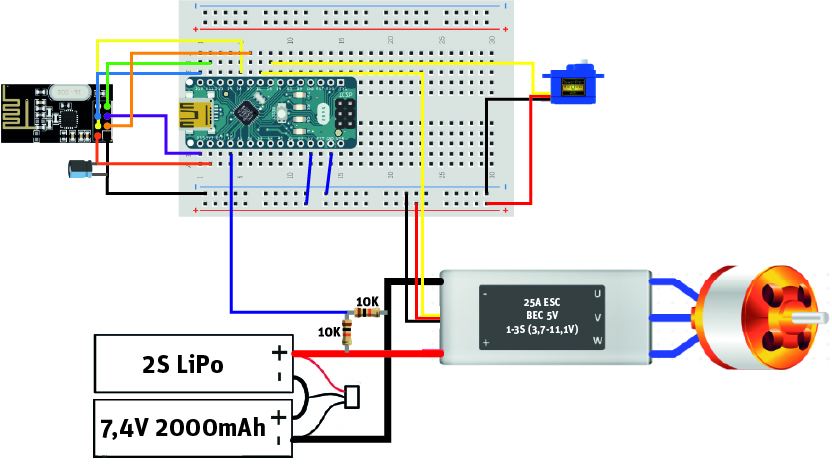
Receiver schematic
This is the wiring for the boat (receiver).
Schematic_receiver.jpg
Comments
Only logged in users can leave comments