Devices & Components
16x2 LCD display with I²C interface
Arduino Uno Rev3
LED (generic)
Gravity: Analog Flame Sensor For Arduino
Relay Subbase, DC Type
Male/Female Jumper Wires
RFID reader (generic)
PIR Motion Sensor (generic)
Breadboard (generic)
Buzzer, Piezo
Jumper wires (generic)
RFID Module (Generic)
Hardware & Tools
Soldering iron (generic)
Software & Tools
Arduino IDE
Project description
Code
Code for the Flame Sensor
arduino
1#include <Wire.h> 2#include <LiquidCrystal_I2C.h> 3 4// Set the LCD address to 0x27 for a 16 chars and 2 line display 5LiquidCrystal_I2C lcd(0x27, 16, 2); 6 7int flameSensorPin = 0; // input pin for flame sensor 8int fR; // reading of the flame sensor 9int buzzerPin=8; // pin assigned to buzzer 10int tt=1023; 11void setup(void) 12{ 13 Serial.begin(9600); // starting the serial monitor 14 pinMode(buzzerPin,OUTPUT); // output for the buzzer 15 pinMode(7, OUTPUT); // output for the DC relay 16} 17void loop(void) 18{ 19 fR = analogRead(flameSensorPin); // reads the flamesensor pin 20 21 22 if(fR<1023) //if loop for flame detected 23 { 24 25 digitalWrite(7, HIGH); //DC relay turned on 26 digitalWrite(buzzerPin,HIGH); //buzzer turned on 27 delay(1000); 28 digitalWrite(7, LOW); //DC relay turned on 29 30 // initialize the LCD 31 lcd.begin(); 32 33 // Turn on the blacklight and print a message. 34 lcd.backlight(); 35 lcd.print("LCD is Working"); 36 37 } 38else // incase no fire detected 39 { 40 digitalWrite(buzzerPin,LOW); 41 digitalWrite(7, LOW); 42 delay(1000); 43 } 44 45 Serial.print("Analog reading = "); 46 Serial.println(fR); // the raw analog reading delay(1000); 47 delay(500); 48} 49
Code for the Flame Sensor
arduino
1#include <Wire.h> 2#include <LiquidCrystal_I2C.h> 3 4// Set the LCD address to 0x27 for a 16 chars and 2 line display 5LiquidCrystal_I2C lcd(0x27, 16, 2); 6 7int flameSensorPin = 0; // input pin for flame sensor 8int fR; // reading of the flame sensor 9int buzzerPin=8; // pin assigned to buzzer 10int tt=1023; 11void setup(void) 12{ 13 Serial.begin(9600); // starting the serial monitor 14 pinMode(buzzerPin,OUTPUT); // output for the buzzer 15 pinMode(7, OUTPUT); // output for the DC relay 16} 17void loop(void) 18{ 19 fR = analogRead(flameSensorPin); // reads the flamesensor pin 20 21 22 if(fR<1023) //if loop for flame detected 23 { 24 25 digitalWrite(7, HIGH); //DC relay turned on 26 digitalWrite(buzzerPin,HIGH); //buzzer turned on 27 delay(1000); 28 digitalWrite(7, LOW); //DC relay turned on 29 30 // initialize the LCD 31 lcd.begin(); 32 33 // Turn on the blacklight and print a message. 34 lcd.backlight(); 35 lcd.print("LCD is Working"); 36 37 } 38else // incase no fire detected 39 { 40 digitalWrite(buzzerPin,LOW); 41 digitalWrite(7, LOW); 42 delay(1000); 43 } 44 45 Serial.print("Analog reading = "); 46 Serial.println(fR); // the raw analog reading delay(1000); 47 delay(500); 48} 49
Downloadable files
Pseudo Code
This is the Pseudo code for the project which shows how the project is supposed to be implemented. It is gives the user a step by step idea on how the project works.
Pseudo Code
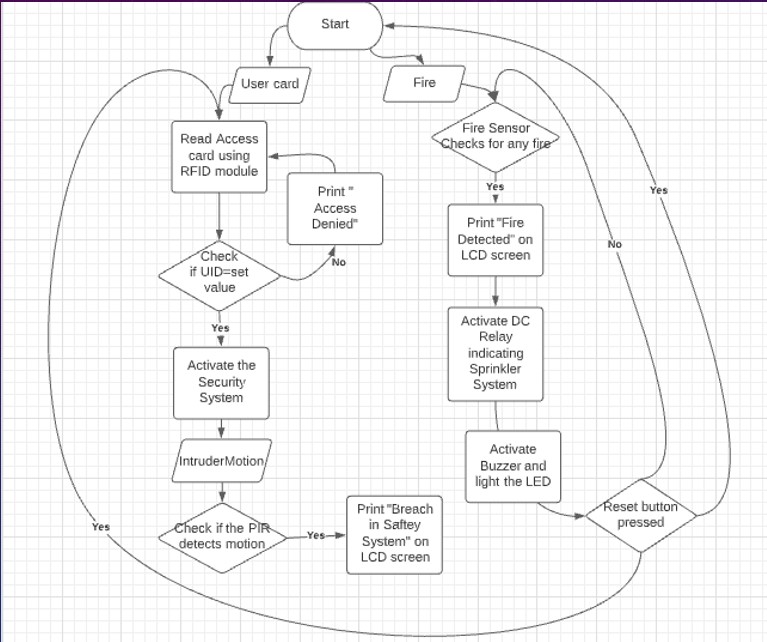
Flowchart
This is the flowchart for the project and gives a general idea on what the Home Safety System should do and how it performs
Flowchart
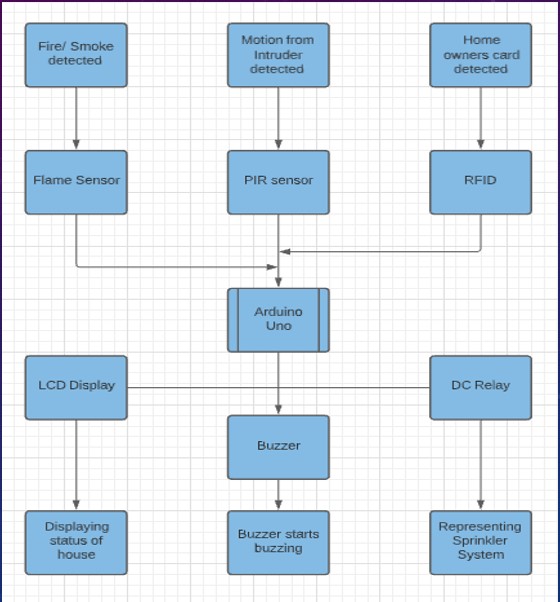
Pseudo Code
This is the Pseudo code for the project which shows how the project is supposed to be implemented. It is gives the user a step by step idea on how the project works.
Pseudo Code

Documentation
EAGLE schematic
This is the EAGLE schematic for the circuit which shows h=all the proper connections of each component to the Arduino Uno
EAGLE schematic
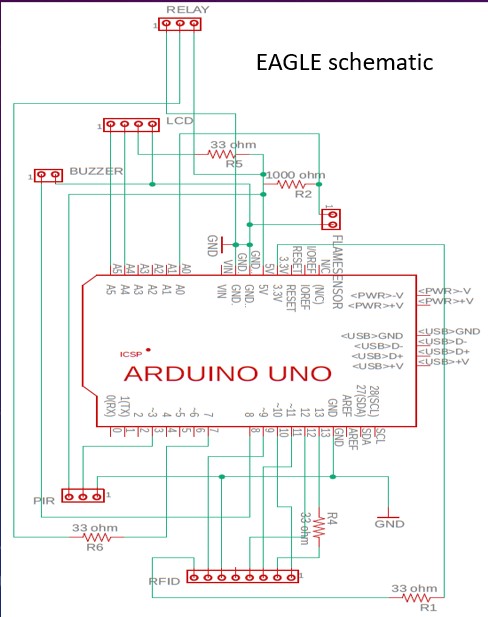
EAGLE schematic
This is the EAGLE schematic for the circuit which shows h=all the proper connections of each component to the Arduino Uno
EAGLE schematic

Comments
Only logged in users can leave comments