The Robot who displayed Consciousness!
This project was designed to explore machines and humans' non-cognitive consciousness based on Human Mental Handicap.
Components and supplies
1
Jumper wires (generic)
1
Ultrasonic Sensor - HC-SR04 (Generic)
1
Arduino UNO
1
Arduino Proto Shield
1
9V battery (generic)
1
SG90 Micro-servo motor
1
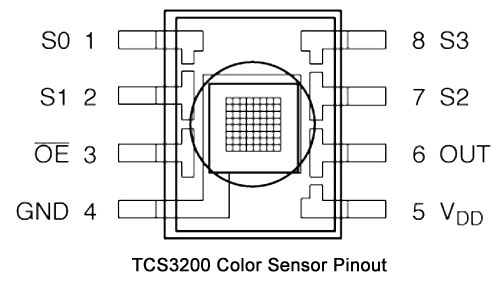
Color Photo Sensor, RGB
Project description
Code
Color Recognition
arduino
1// TCS230 or TCS3200 pins wiring to Arduino
2#define S0 4
3#define  S1 5
4#define S2 6
5#define S3 7
6#define sensorOut 8
7
8// Stores frequency  read by the photodiodes
9int redFrequency = 0;
10int greenFrequency = 0;
11int  blueFrequency = 0;
12
13// Stores the red. green and blue colors
14int redColor  = 0;
15int greenColor = 0;
16int blueColor = 0;
17
18void setup() {
19  //  Setting the outputs
20  pinMode(S0, OUTPUT);
21  pinMode(S1, OUTPUT);
22  pinMode(S2,  OUTPUT);
23  pinMode(S3, OUTPUT);
24
25  // Setting the sensorOut as an input
26  pinMode(sensorOut, INPUT);
27
28  // Setting frequency scaling to 20%
29  digitalWrite(S0,HIGH);
30  digitalWrite(S1,LOW);
31
32  // Begins serial  communication
33  Serial.begin(9600);
34}
35
36void loop() {
37  // Setting  RED (R) filtered photodiodes to be read
38  digitalWrite(S2,LOW);
39  digitalWrite(S3,LOW);
40
41  // Reading the output frequency
42  redFrequency = pulseIn(sensorOut, LOW);
43  // Remaping the value of the RED (R) frequency from 0 to 255
44  // You must  replace with your own values. Here's an example:
45  // redColor = map(redFrequency,  70, 120, 255,0);
46  redColor = map(redFrequency, XX, XX, 255,0);
47
48  //  Printing the RED (R) value
49  Serial.print("R = ");
50  Serial.print(redColor);
51  delay(100);
52
53  // Setting GREEN (G) filtered photodiodes to be read
54  digitalWrite(S2,HIGH);
55  digitalWrite(S3,HIGH);
56
57  // Reading the output  frequency
58  greenFrequency = pulseIn(sensorOut, LOW);
59  // Remaping the value  of the GREEN (G) frequency from 0 to 255
60  // You must replace with your own  values. Here's an example:
61  // greenColor = map(greenFrequency, 100, 199, 255,  0);
62  greenColor = map(greenFrequency, XX, XX, 255, 0);
63
64  // Printing  the GREEN (G) value
65  Serial.print(" G = ");
66  Serial.print(greenColor);
67  delay(100);
68
69  // Setting BLUE (B) filtered photodiodes to be read
70  digitalWrite(S2,LOW);
71  digitalWrite(S3,HIGH);
72
73  // Reading the output  frequency
74  blueFrequency = pulseIn(sensorOut, LOW);
75  // Remaping the value  of the BLUE (B) frequency from 0 to 255
76  // You must replace with your own values.  Here's an example:
77  // blueColor = map(blueFrequency, 38, 84, 255, 0);
78  blueColor = map(blueFrequency, XX, XX, 255, 0);
79
80  // Printing the BLUE  (B) value
81  Serial.print(" B = ");
82  Serial.print(blueColor);
83  delay(100);
84
85  // Checks the current detected color and prints
86  // a message in the serial  monitor
87  if(redColor > greenColor && redColor > blueColor){
88      Serial.println("  - RED detected!");
89  }
90  if(greenColor > redColor && greenColor > blueColor){
91    Serial.println(" - GREEN detected!");
92  }
93  if(blueColor > redColor  && blueColor > greenColor){
94    Serial.println(" - BLUE detected!");
95  }
96}
97
Color Recognition
arduino
1// TCS230 or TCS3200 pins wiring to Arduino
2#define S0 4
3#define   S1 5
4#define S2 6
5#define S3 7
6#define sensorOut 8
7
8// Stores frequency   read by the photodiodes
9int redFrequency = 0;
10int greenFrequency = 0;
11int   blueFrequency = 0;
12
13// Stores the red. green and blue colors
14int redColor   = 0;
15int greenColor = 0;
16int blueColor = 0;
17
18void setup() {
19  //   Setting the outputs
20  pinMode(S0, OUTPUT);
21  pinMode(S1, OUTPUT);
22  pinMode(S2,   OUTPUT);
23  pinMode(S3, OUTPUT);
24
25  // Setting the sensorOut as an input
26   pinMode(sensorOut, INPUT);
27
28  // Setting frequency scaling to 20%
29   digitalWrite(S0,HIGH);
30  digitalWrite(S1,LOW);
31
32  // Begins serial   communication
33  Serial.begin(9600);
34}
35
36void loop() {
37  // Setting   RED (R) filtered photodiodes to be read
38  digitalWrite(S2,LOW);
39  digitalWrite(S3,LOW);
40
41  // Reading the output frequency
42  redFrequency = pulseIn(sensorOut, LOW);
43   // Remaping the value of the RED (R) frequency from 0 to 255
44  // You must   replace with your own values. Here's an example:
45  // redColor = map(redFrequency,   70, 120, 255,0);
46  redColor = map(redFrequency, XX, XX, 255,0);
47
48  //   Printing the RED (R) value
49  Serial.print("R = ");
50  Serial.print(redColor);
51   delay(100);
52
53  // Setting GREEN (G) filtered photodiodes to be read
54   digitalWrite(S2,HIGH);
55  digitalWrite(S3,HIGH);
56
57  // Reading the output   frequency
58  greenFrequency = pulseIn(sensorOut, LOW);
59  // Remaping the value   of the GREEN (G) frequency from 0 to 255
60  // You must replace with your own   values. Here's an example:
61  // greenColor = map(greenFrequency, 100, 199, 255,   0);
62  greenColor = map(greenFrequency, XX, XX, 255, 0);
63
64  // Printing   the GREEN (G) value
65  Serial.print(" G = ");
66  Serial.print(greenColor);
67   delay(100);
68
69  // Setting BLUE (B) filtered photodiodes to be read
70   digitalWrite(S2,LOW);
71  digitalWrite(S3,HIGH);
72
73  // Reading the output   frequency
74  blueFrequency = pulseIn(sensorOut, LOW);
75  // Remaping the value   of the BLUE (B) frequency from 0 to 255
76  // You must replace with your own values.   Here's an example:
77  // blueColor = map(blueFrequency, 38, 84, 255, 0);
78   blueColor = map(blueFrequency, XX, XX, 255, 0);
79
80  // Printing the BLUE   (B) value
81  Serial.print(" B = ");
82  Serial.print(blueColor);
83  delay(100);
84
85   // Checks the current detected color and prints
86  // a message in the serial   monitor
87  if(redColor > greenColor && redColor > blueColor){
88      Serial.println("   - RED detected!");
89  }
90  if(greenColor > redColor && greenColor > blueColor){
91     Serial.println(" - GREEN detected!");
92  }
93  if(blueColor > redColor   && blueColor > greenColor){
94    Serial.println(" - BLUE detected!");
95  }
96}
97
Downloadable files
Pinouts
Pinouts
Comments
Only logged in users can leave comments