Matchbox LEDs with ESP8266 IoT
One IoT device controlled by wifi inside a Matchbox -Battery included!
Devices & Components
ESP8266 ESP-01
LED (generic)
Coin Cell Battery CR2032
Hardware & Tools
Soldering iron (generic)
Software & Tools
MATCHBOX - ESP8266
matchbox
Project description
Code
MATCHBOX -ESP8266
arduino
This code runs in the esp8266 you do not need and arduino module. You need to upload directly using a serial port to the ESP8266, selecting the esp8266 module library of the Arduino IDE.Remember that you need GPIO0 pin connected to ground to upload the code to the esp8266 Module
1/*
2 *  This sketch demonstrates how to set up a simple HTTP-like server.
3   *  The server will set a GPIO pin depending on the request
4 *    http://server_ip/gpio1/0   will set the GPIO0 low,
5 *    http://server_ip/gpio1/1 will set the GPIO0 high
6   *    http://server_ip/gpi2/0 will set the GPIO2 low,
7 *    http://server_ip/gpi2/1   will set the GPIO2 high
8 *  server_ip is the IP address of the ESP8266 module,   will be
9 *  printed to Serial when the module is connected.
10 */
11
12//   Updated: august 2-2017 - to be used with APP Inventor 2
13// Developed by: Hernando   Bolaños
14
15#include <ESP8266WiFi.h>
16const char* ssid = "FAMILIA BM ";
17const   char* password = "99091300";
18
19// Create an instance of the server
20//   specify the port to listen on as an argument
21WiFiServer server(80);
22
23void   setup() {
24  Serial.begin(115200);
25  delay(10);
26
27  // prepare GPIO2 -   OK
28  pinMode(2, OUTPUT);
29  digitalWrite(2, 0);
30
31  // prepare GPIO0 -OK
32  pinMode(0, OUTPUT);
33  digitalWrite(0, 0);
34
35
36  // Connect to   WiFi network
37  Serial.println();
38  Serial.println();
39  Serial.print("Connecting   to ");
40  Serial.println(ssid);
41
42  WiFi.begin(ssid, password);
43
44   while (WiFi.status() != WL_CONNECTED) {
45    delay(500);
46    Serial.print(".");
47   }
48  Serial.println("");
49  Serial.println("WiFi connected");
50
51   // Start the server
52  server.begin();
53  Serial.println("Server started");
54
55
56
57  // Print the IP address
58  Serial.println(WiFi.localIP());
59
60}
61
62void loop() {
63  // Check if a client has connected
64  WiFiClient   client = server.available();
65  if (!client) {
66    return;
67  }
68
69   // Wait until the client sends some data
70  Serial.println("new client");
71   while(!client.available()){
72    delay(1);
73  }
74
75  // Read the first   line of the request
76  String req = client.readStringUntil('\
');
77  Serial.println(req);
78   client.flush();
79
80  // Match the request
81  int val1;
82 int val2;
83   if (req.indexOf("/gpio1/0") != -1)
84    {val1 = 0;
85    digitalWrite(0, val1);   // Set GPIO2 according to the request
86  client.flush();
87
88  // Prepare the   response
89  String s = "HTTP/1.1 200 OK\
\
90Content-Type: text/html\
\
91\
\
92<!DOCTYPE   HTML>\
\
93<html>\
 MatchBox Prototype APP - LED GREEN on GPIO0 is now ";
94   s += (val1)?"high":"low";
95  s += "-MacthBox Device working Good!!\
96";
97
98
99  // Send the response to the client
100  client.print(s);
101  delay(1);
102
103  Serial.println("Client disconnected");
104
105  // The client will actually   be disconnected
106  // when the function returns and 'client' object is detroyed
107
108
109    }
110 if (req.indexOf("/gpio1/1") != -1)
111    {val1 = 1;
112    digitalWrite(0,   val1); // Set GPIO2 according to the request
113    client.flush();
114 // Prepare   the response
115  String s = "HTTP/1.1 200 OK\
\
116Content-Type: text/html\
\
117\
\
118<!DOCTYPE   HTML>\
\
119<html>\
\
120 MatchBox Prototype APP - LED GREEN on GPIO0 is now ";
121   s += (val1)?"high":"low";
122  s += "-MacthBox Device working Good!!\
123";
124
125
126  // Send the response to the client
127  client.print(s);
128  delay(100);
129
130  Serial.println("Client disconnected");
131
132  // The client will actually   be disconnected
133  // when the function returns and 'client' object is detroyed
134
135   }
136 if (req.indexOf("/gpio2/0") != -1)
137   {val2 = 0;
138   digitalWrite(2,   val2); // Set GPIO2 according to the request
139    client.flush();
140 // Prepare   the response
141  String s = "HTTP/1.1 200 OK\
\
142Content-Type: text/html\
\
143\
\
144<!DOCTYPE   HTML>\
\
145<html>\
\
146 MatchBox Prototype APP - LED RED on GPIO2 is now ";
147   s += (val2)?"high":"low";
148  s += "-MacthBox Device working Good!!\
149";
150
151
152  // Send the response to the client
153  client.print(s);
154  delay(100);
155
156  Serial.println("Client disconnected");
157
158  // The client will actually   be disconnected
159  // when the function returns and 'client' object is detroyed
160   }
161 if (req.indexOf("/gpio2/1") != -1)
162   {val2 = 1;
163
164digitalWrite(2,   val2); // Set GPIO2 according to the request
165    client.flush();
166 // Prepare   the response
167  String s = "HTTP/1.1 200 OK\
\
168Content-Type: text/html\
\
169\
\
170<!DOCTYPE   HTML>\
\
171<html>\
\
172 MatchBox Prototype APP - LED RED on GPIO2 is now ";
173   s += (val2)?"high":"low";
174  s += "-MacthBox Device working Good\
175";
176
177
178  // Send the response to the client
179  client.print(s);
180  delay(100);
181
182  Serial.println("Client disconnected");
183
184  // The client will actually   be disconnected
185  // when the function returns and 'client' object is detroyed}
186
187   }
188  else {
189    Serial.println("invalid request");
190    client.stop();
191     return;
192
193  }
194}
195
196
MATCHBOX -ESP8266
arduino
This code runs in the esp8266 you do not need and arduino module. You need to upload directly using a serial port to the ESP8266, selecting the esp8266 module library of the Arduino IDE.Remember that you need GPIO0 pin connected to ground to upload the code to the esp8266 Module
1/*
2 *  This sketch demonstrates how to set up a simple HTTP-like server.
3  *  The server will set a GPIO pin depending on the request
4 *    http://server_ip/gpio1/0  will set the GPIO0 low,
5 *    http://server_ip/gpio1/1 will set the GPIO0 high
6  *    http://server_ip/gpi2/0 will set the GPIO2 low,
7 *    http://server_ip/gpi2/1  will set the GPIO2 high
8 *  server_ip is the IP address of the ESP8266 module,  will be
9 *  printed to Serial when the module is connected.
10 */
11
12//  Updated: august 2-2017 - to be used with APP Inventor 2
13// Developed by: Hernando  Bolaños
14
15#include <ESP8266WiFi.h>
16const char* ssid = "FAMILIA BM ";
17const  char* password = "99091300";
18
19// Create an instance of the server
20//  specify the port to listen on as an argument
21WiFiServer server(80);
22
23void  setup() {
24  Serial.begin(115200);
25  delay(10);
26
27  // prepare GPIO2 -  OK
28  pinMode(2, OUTPUT);
29  digitalWrite(2, 0);
30
31  // prepare GPIO0 -OK
32  pinMode(0, OUTPUT);
33  digitalWrite(0, 0);
34
35
36  // Connect to  WiFi network
37  Serial.println();
38  Serial.println();
39  Serial.print("Connecting  to ");
40  Serial.println(ssid);
41
42  WiFi.begin(ssid, password);
43
44  while (WiFi.status() != WL_CONNECTED) {
45    delay(500);
46    Serial.print(".");
47  }
48  Serial.println("");
49  Serial.println("WiFi connected");
50
51  // Start the server
52  server.begin();
53  Serial.println("Server started");
54
55
56
57  // Print the IP address
58  Serial.println(WiFi.localIP());
59
60}
61
62void loop() {
63  // Check if a client has connected
64  WiFiClient  client = server.available();
65  if (!client) {
66    return;
67  }
68
69  // Wait until the client sends some data
70  Serial.println("new client");
71  while(!client.available()){
72    delay(1);
73  }
74
75  // Read the first  line of the request
76  String req = client.readStringUntil('\r');
77  Serial.println(req);
78  client.flush();
79
80  // Match the request
81  int val1;
82 int val2;
83  if (req.indexOf("/gpio1/0") != -1)
84    {val1 = 0;
85    digitalWrite(0, val1);  // Set GPIO2 according to the request
86  client.flush();
87
88  // Prepare the  response
89  String s = "HTTP/1.1 200 OK\
\
90Content-Type: text/html\
\
91\
\
92<!DOCTYPE  HTML>\
\
93<html>\
 MatchBox Prototype APP - LED GREEN on GPIO0 is now ";
94  s += (val1)?"high":"low";
95  s += "-MacthBox Device working Good!!\
96";
97
98
99  // Send the response to the client
100  client.print(s);
101  delay(1);
102
103  Serial.println("Client disconnected");
104
105  // The client will actually  be disconnected
106  // when the function returns and 'client' object is detroyed
107
108
109    }
110 if (req.indexOf("/gpio1/1") != -1)
111    {val1 = 1;
112    digitalWrite(0,  val1); // Set GPIO2 according to the request
113    client.flush();
114 // Prepare  the response
115  String s = "HTTP/1.1 200 OK\
\
116Content-Type: text/html\
\
117\
\
118<!DOCTYPE  HTML>\
\
119<html>\
\
120 MatchBox Prototype APP - LED GREEN on GPIO0 is now ";
121  s += (val1)?"high":"low";
122  s += "-MacthBox Device working Good!!\
123";
124
125
126  // Send the response to the client
127  client.print(s);
128  delay(100);
129
130  Serial.println("Client disconnected");
131
132  // The client will actually  be disconnected
133  // when the function returns and 'client' object is detroyed
134
135   }
136 if (req.indexOf("/gpio2/0") != -1)
137   {val2 = 0;
138   digitalWrite(2,  val2); // Set GPIO2 according to the request
139    client.flush();
140 // Prepare  the response
141  String s = "HTTP/1.1 200 OK\
\
142Content-Type: text/html\
\
143\
\
144<!DOCTYPE  HTML>\
\
145<html>\
\
146 MatchBox Prototype APP - LED RED on GPIO2 is now ";
147  s += (val2)?"high":"low";
148  s += "-MacthBox Device working Good!!\
149";
150
151
152  // Send the response to the client
153  client.print(s);
154  delay(100);
155
156  Serial.println("Client disconnected");
157
158  // The client will actually  be disconnected
159  // when the function returns and 'client' object is detroyed
160  }
161 if (req.indexOf("/gpio2/1") != -1)
162   {val2 = 1;
163
164digitalWrite(2,  val2); // Set GPIO2 according to the request
165    client.flush();
166 // Prepare  the response
167  String s = "HTTP/1.1 200 OK\
\
168Content-Type: text/html\
\
169\
\
170<!DOCTYPE  HTML>\
\
171<html>\
\
172 MatchBox Prototype APP - LED RED on GPIO2 is now ";
173  s += (val2)?"high":"low";
174  s += "-MacthBox Device working Good\
175";
176
177
178  // Send the response to the client
179  client.print(s);
180  delay(100);
181
182  Serial.println("Client disconnected");
183
184  // The client will actually  be disconnected
185  // when the function returns and 'client' object is detroyed}
186
187   }
188  else {
189    Serial.println("invalid request");
190    client.stop();
191    return;
192
193  }
194}
195
196
Downloadable files
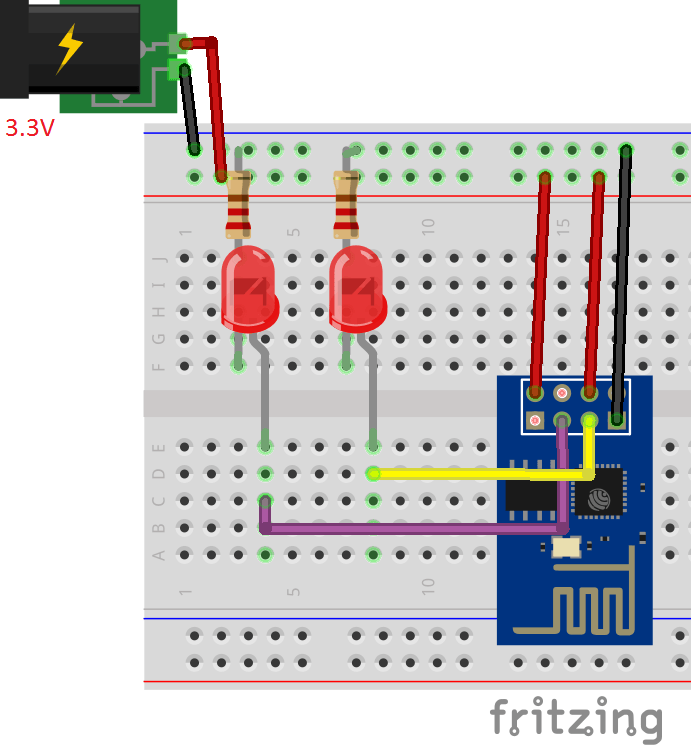
SCHEMATIC
ESP8266 PINS CONNECTED TO POWER SOURCE AND LEDS- (GREEN LED TO GPIO0 - RED LED TO GPIO2)
SCHEMATIC
Comments
Only logged in users can leave comments