Devices & Components
Arduino Motor Shield Rev3
Arduino Uno Rev3
Hardware & Tools
DC motor
BNO055
Software & Tools
Arduino 1.8.19
Project description
Code
Gyrometer
c
To implement the gyrometer loop.
1#include <Wire.h> 2#include <Adafruit_Sensor.h> 3#include <Adafruit_BNO055.h> 4#include <utility/imumaths.h> 5 6/* This driver reads raw data from the BNO055 7 8 Connections 9 =========== 10 Connect SCL to analog 5 11 Connect SDA to analog 4 12 Connect VDD to 3.3V DC 13 Connect GROUND to common ground 14 15 History 16 ======= 17 2015/MAR/03 - First release (KTOWN) 18*/ 19 20/* Set the delay between fresh samples */ 21#define BNO055_SAMPLERATE_DELAY_MS (10) 22 23// Check I2C device address and correct line below (by default address is 0x29 or 0x28) 24// id, address 25Adafruit_BNO055 bno = Adafruit_BNO055(-1, 0x28, &Wire); 26 27// Pour faire fonctionner le moteur en PWM 28int pwmPinA = 3; 29int pwmPinB = 11; 30int dirPinA = 12; 31int dirPinB = 13; 32//int titi = 100; 33 34int titiy = 0; 35int titiz = 0; 36 37/**************************************************************************/ 38/* 39 Arduino setup function (automatically called at startup) 40*/ 41/**************************************************************************/ 42void setup(void) 43{ 44// pinMode(6, OUTPUT); 45 pinMode(pwmPinA, OUTPUT); 46 pinMode(pwmPinB, OUTPUT); 47 pinMode(dirPinA, OUTPUT); 48 pinMode(dirPinB, OUTPUT); 49 Serial.begin(115200); 50 51 while (!Serial) delay(10); // wait for serial port to open! 52 53 Serial.println("Orientation Sensor Raw Data Test"); Serial.println(""); 54 55 /* Initialise the sensor */ 56 if(!bno.begin()) 57 { 58 /* There was a problem detecting the BNO055 ... check your connections */ 59 Serial.print("Ooops, no BNO055 detected ... Check your wiring or I2C ADDR!"); 60 while(1); 61 } 62 63 delay(1000); 64 65 /* Display the current temperature */ 66 int8_t temp = bno.getTemp(); 67// Serial.print("Current Temperature: "); 68// Serial.print(temp); 69// Serial.println(" C"); 70// Serial.println(""); 71 72 bno.setExtCrystalUse(true); 73 74// Serial.println("Calibration status values: 0=uncalibrated, 3=fully calibrated"); 75} 76 77/**************************************************************************/ 78/* 79 Arduino loop function, called once 'setup' is complete (your own code 80 should go here) 81*/ 82/**************************************************************************/ 83void loop(void) 84{ 85// digitalWrite(6, HIGH); // turn the LED on (HIGH is the voltage level) 86// delay(1000); // wait for a second 87// digitalWrite(6, LOW); // turn the LED off by making the voltage LOW 88// delay(1000); // wait for a second 89 90 // Possible vector values can be: 91 // - VECTOR_ACCELEROMETER - m/s^2 92 // - VECTOR_MAGNETOMETER - uT 93 // - VECTOR_GYROSCOPE - rad/s 94 // - VECTOR_EULER - degrees 95 // - VECTOR_LINEARACCEL - m/s^2 96 // - VECTOR_GRAVITY - m/s^2 97 imu::Vector<3> euler = bno.getVector(Adafruit_BNO055::VECTOR_EULER); 98 imu::Vector<3> gyros = bno.getVector(Adafruit_BNO055::VECTOR_GYROSCOPE); 99/* 100 int eulerx = 0; 101 eulerx = euler.x(); 102 if((euler.x() <= 360)&&(euler.x()) > 180) { 103 eulerx = euler.x()- 360; 104 } 105*/ 106 int totoz = 3; 107 int totoy = 12; 108 109 /* Display the floating point data */ 110// Serial.print("X: "); 111// Serial.print(euler.x()); 112// Serial.print(" Y: "); 113// Serial.print(euler.y()); 114// Serial.print(" Z: "); 115// Serial.print(euler.z()); 116// Serial.print("\t\n"); 117 118/* 119 if(titi > 0) { 120 totoz = 3- 10* euler.z(); 121 totoy = 13- 10* euler.y(); 122 Serial.println(titi); 123 Serial.println(totoz); 124 Serial.println(totoy); 125 titi--; 126 } 127*/ 128 /* 129 // Quaternion data 130 imu::Quaternion quat = bno.getQuat(); 131 Serial.print("qW: "); 132 Serial.print(quat.w(), 4); 133 Serial.print(" qX: "); 134 Serial.print(quat.x(), 4); 135 Serial.print(" qY: "); 136 Serial.print(quat.y(), 4); 137 Serial.print(" qZ: "); 138 Serial.print(quat.z(), 4); 139 Serial.print("\t\t"); 140 */ 141 142 /* Display calibration status for each sensor. */ 143 uint8_t system, gyro, accel, mag = 0; 144 bno.getCalibration(&system, &gyro, &accel, &mag); 145// Serial.print("CALIBRATION: Sys="); 146// Serial.print(system, DEC); 147// Serial.print(" Gyro="); 148// Serial.print(gyro, DEC); 149// Serial.print(" Accel="); 150// Serial.print(accel, DEC); 151// Serial.print(" Mag="); 152// Serial.println(mag, DEC); 153 154 delay(BNO055_SAMPLERATE_DELAY_MS); 155 156// int x=analogRead(A0); 157// Serial.print("X Potentiometer: "); 158// Serial.println(x); 159 160// Serial.println(totoz -1.1* euler.z()); 161// Serial.println(totoy -1.1* euler.y()); 162// Serial.println(-10 *gyros.z()); 163// Serial.println(-10 *gyros.y()); 164 165 //set work duty for the motor with the PI controller 166 //analogWrite(pwmPin, 1024 -x); // asservissement de la vitesse du moteur avec un potentiomètre 167 if(/*totoz */-1.1* euler.z() < 0) { 168// totoz = 3; 169 digitalWrite(dirPinA, LOW); 170 titiz += -abs(totoz -1.1* euler.z()) /2. -10 *gyros.z(); 171 analogWrite(pwmPinA, titiz); // asservissement de la vitesse du moteur avec un gyromètre 172 } 173 else { 174// totoz = 3; 175 digitalWrite(dirPinA, HIGH); 176 titiz += -abs(totoz -1.1* euler.z()) /2. -10 *gyros.z(); 177 analogWrite(pwmPinA, titiz); // asservissement de la vitesse du moteur avec un gyromètre 178 } 179 if(/*totoy */-1.1* euler.y() < 0) { 180// totoy = 12; 181 digitalWrite(dirPinB, LOW); 182 titiy += -abs(totoy -1.1* euler.y()) /2. -10 *gyros.y(); 183 analogWrite(pwmPinB, titiy); // asservissement de la vitesse du moteur avec un gyromètre 184 } 185 else { 186// totoy = 12; 187 digitalWrite(dirPinB, HIGH); 188 titiy += -abs(totoy -1.1* euler.y()) /2. -10 *gyros.y(); 189 analogWrite(pwmPinB, titiy); // asservissement de la vitesse du moteur avec un gyromètre 190 } 191 //analogWrite(pwmPin, 100); 192}
Downloadable files
Design file
It explains the making of the head up with a DUE.
DossierConceptionNouvelleTêteCivile1.pdf
Documentation
Model of the frame for the robot
It gives the reference of the frame.
https://www.generationrobots.com/fr/404167-black-starter-kit-regular-makerbeamxl.html
Model of the motor 12V
It gives the reference of the motor in 12V.
https://www.conrad.fr/fr/p/modelcraft-rb350200-0a101r-moteur-a-entrainement-12-v-1-200-227579.html
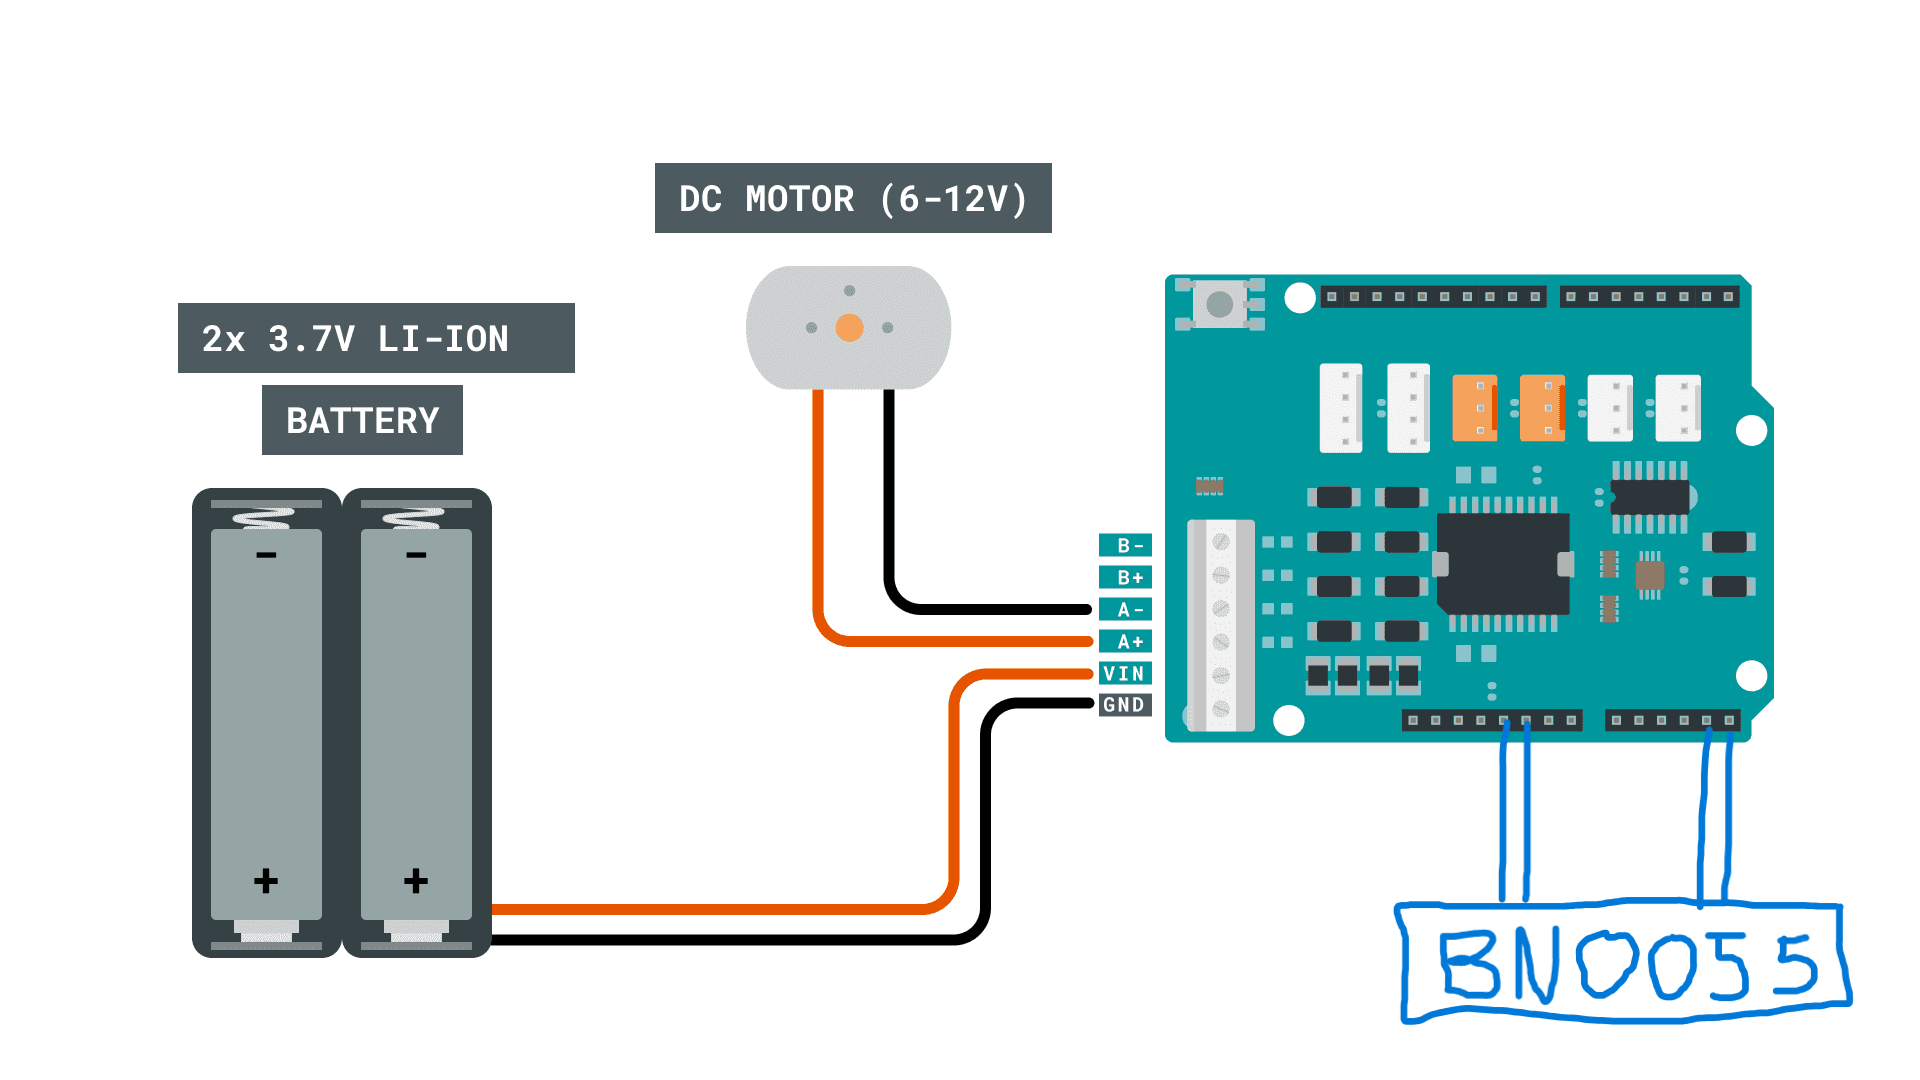
Schematic of the head up with gimbals
I have drawn the wires for the BNO055 board.
file.None
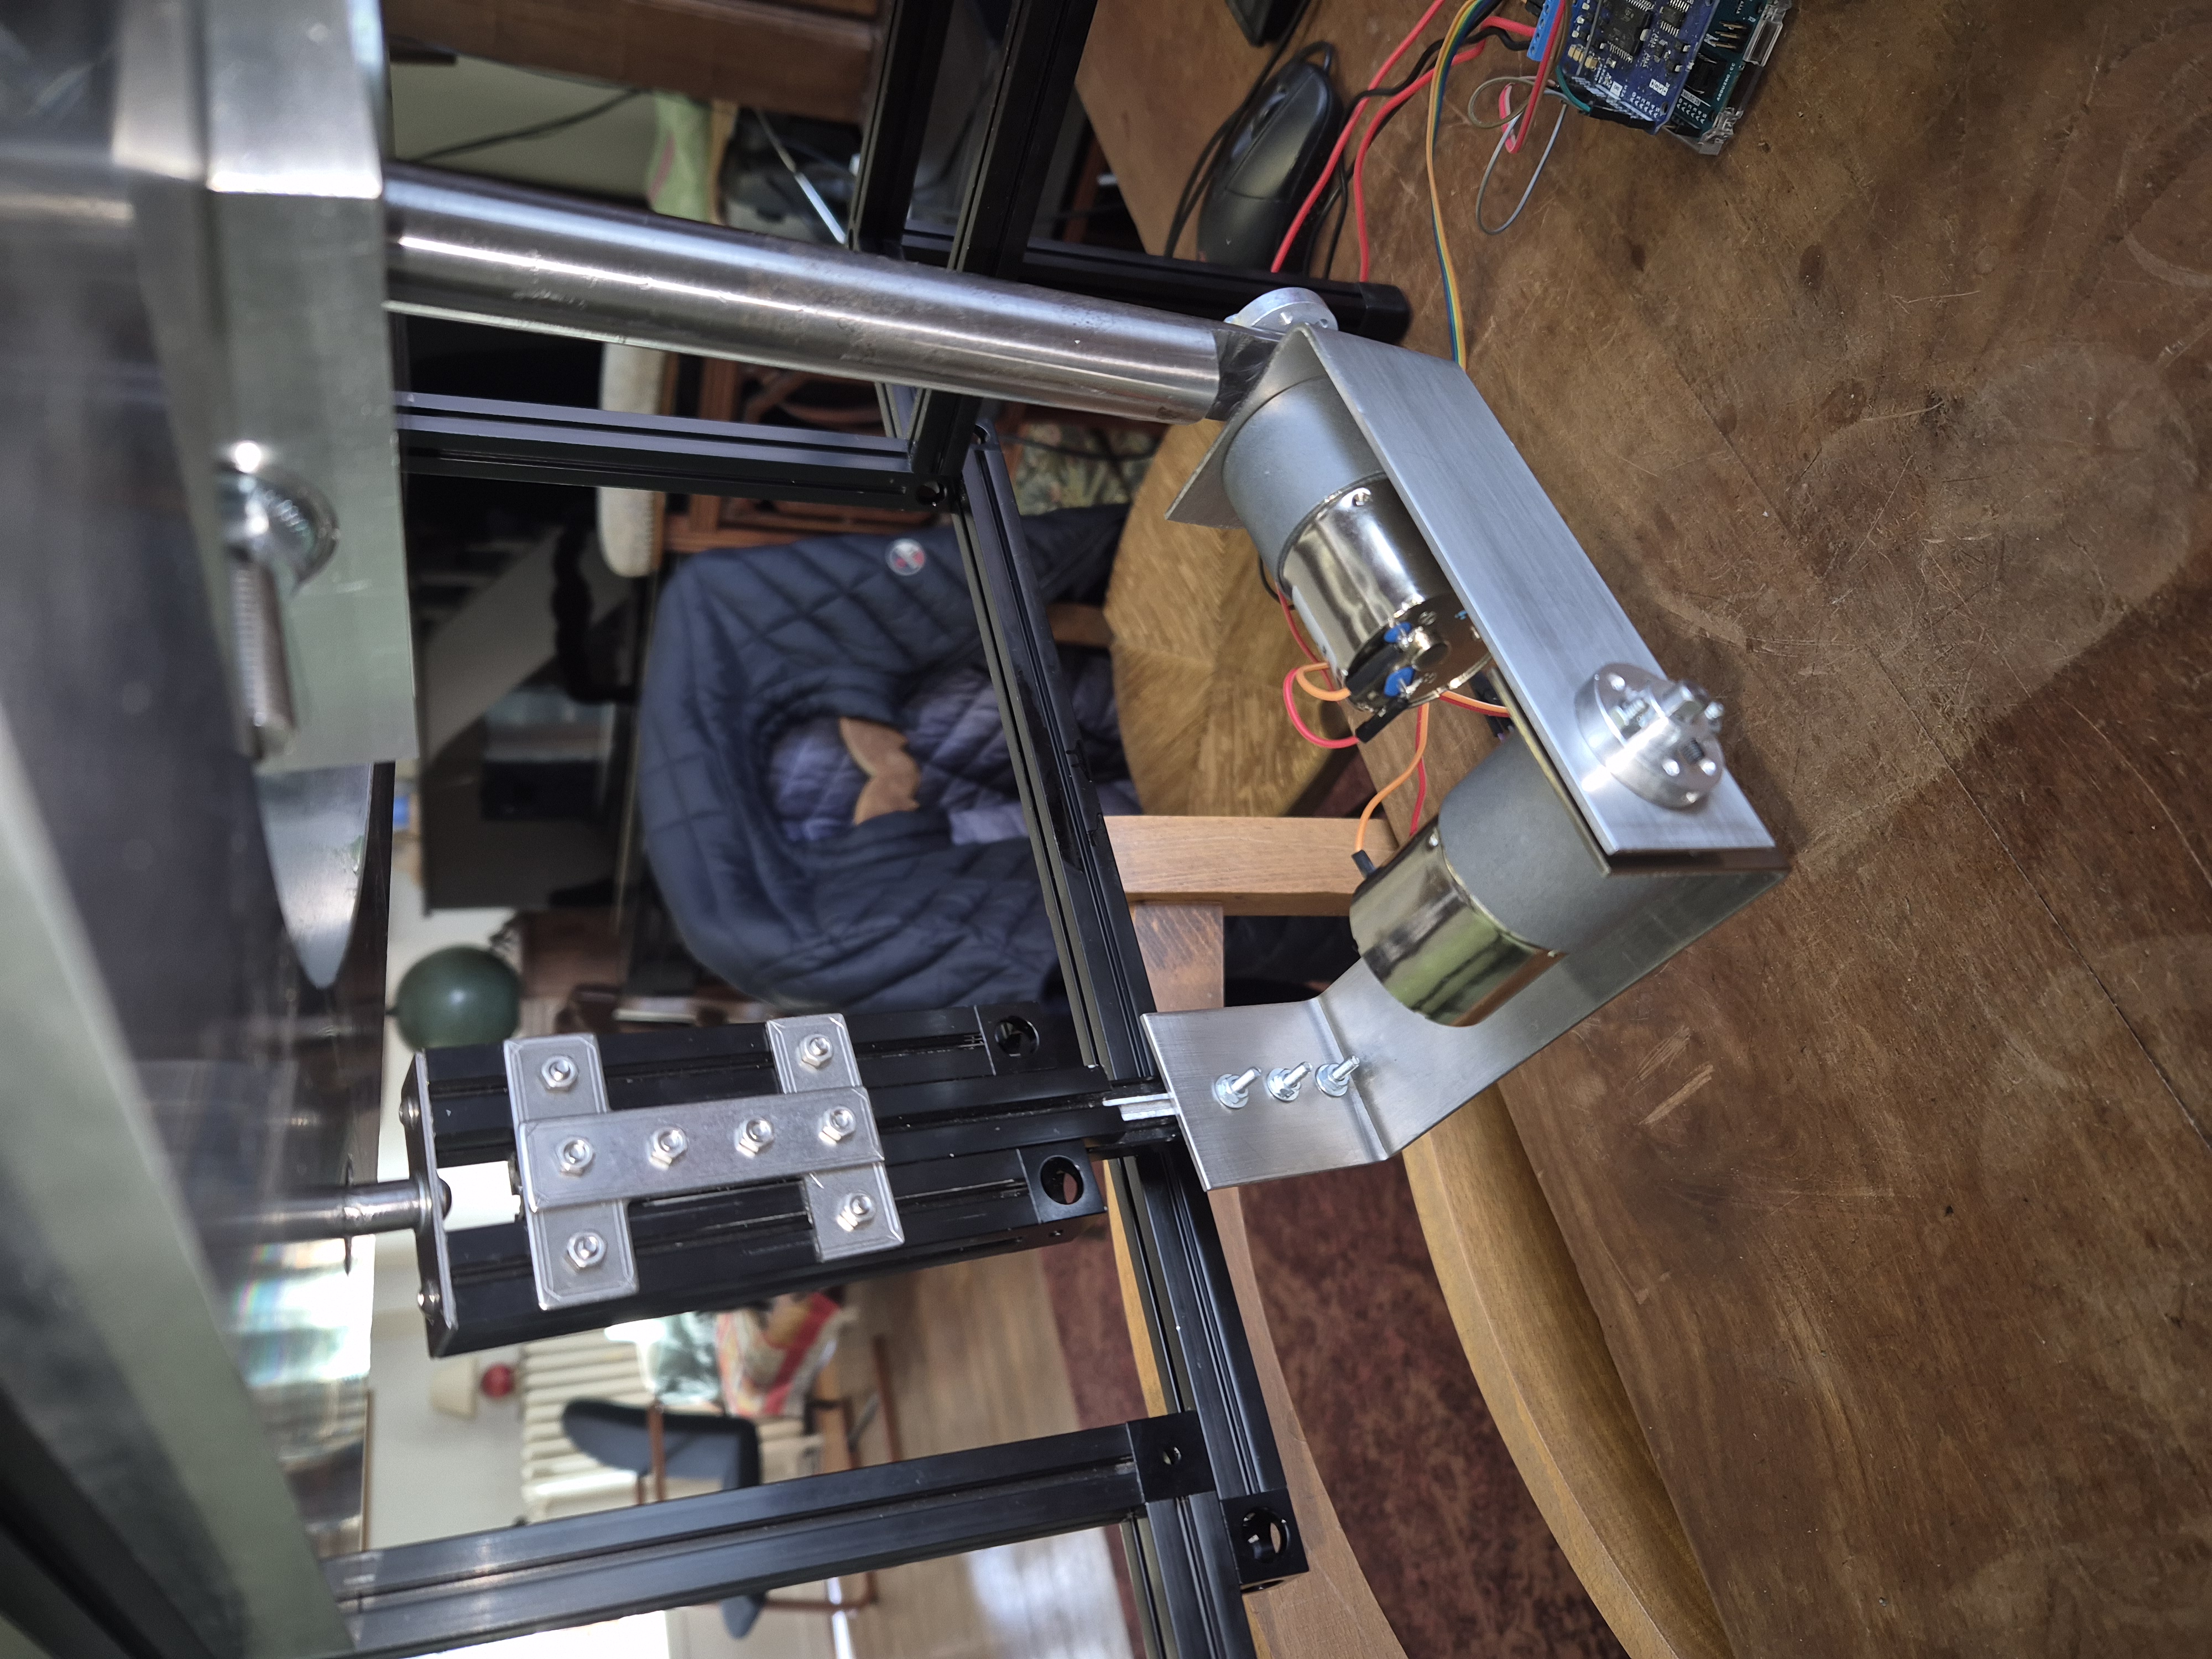
Arm of the robot
It shows the runner of the robot to be patented.
file.None
Mechanical drawings of the robot with support and arm
It gives the mechanical drawings to build it.
https://github.com/EdernOllivierYves/ROBOT
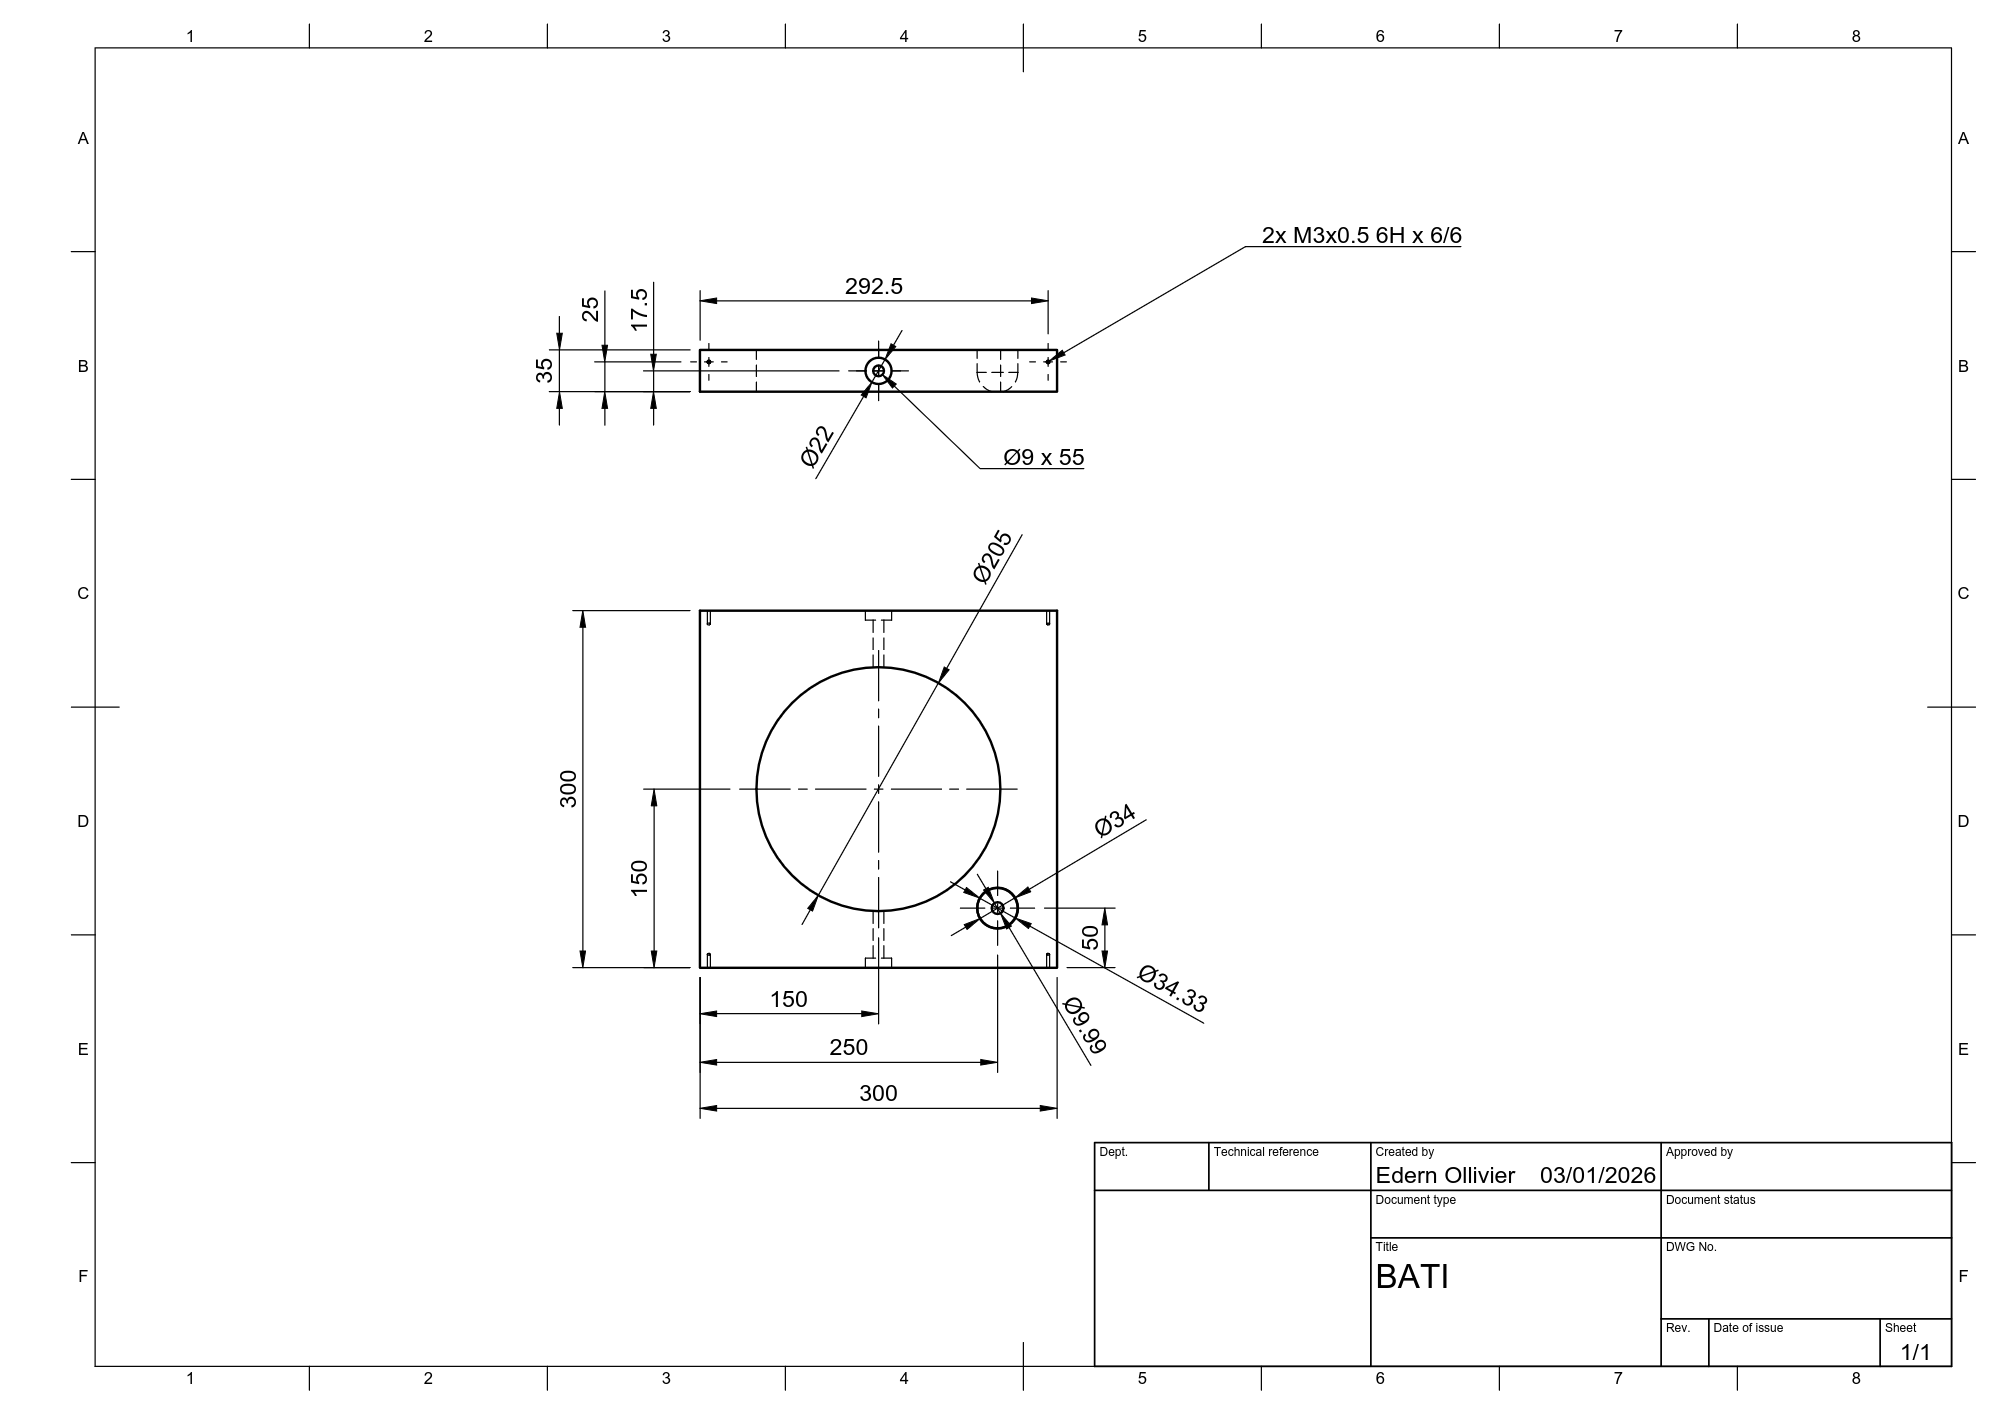
Part one of the mechanical drawings of the gimbals
It is the structure of the robot.
file.None
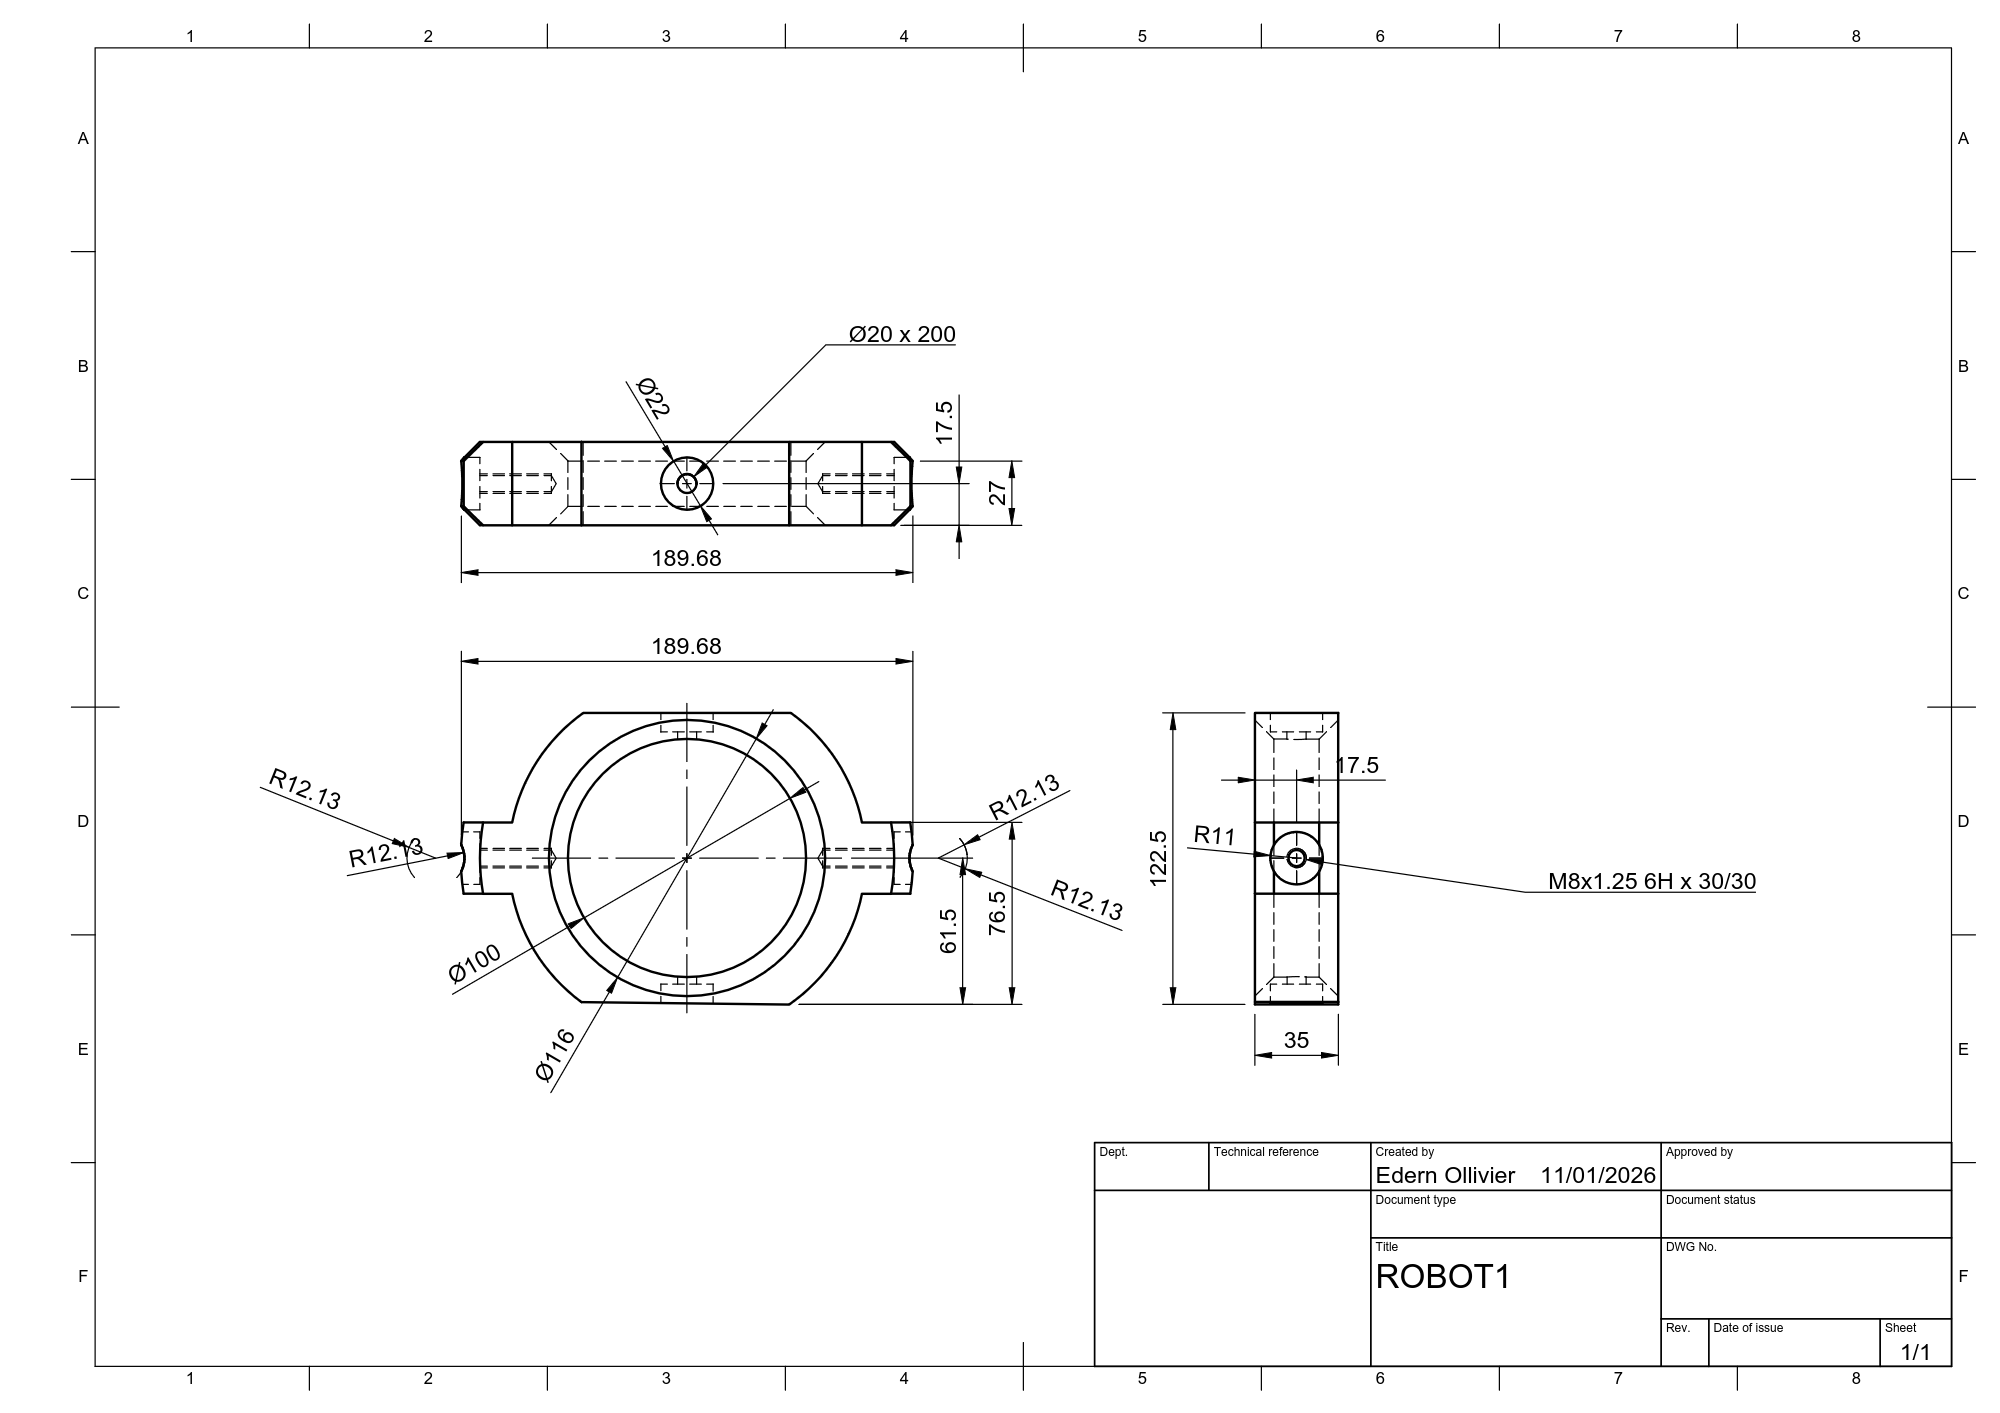
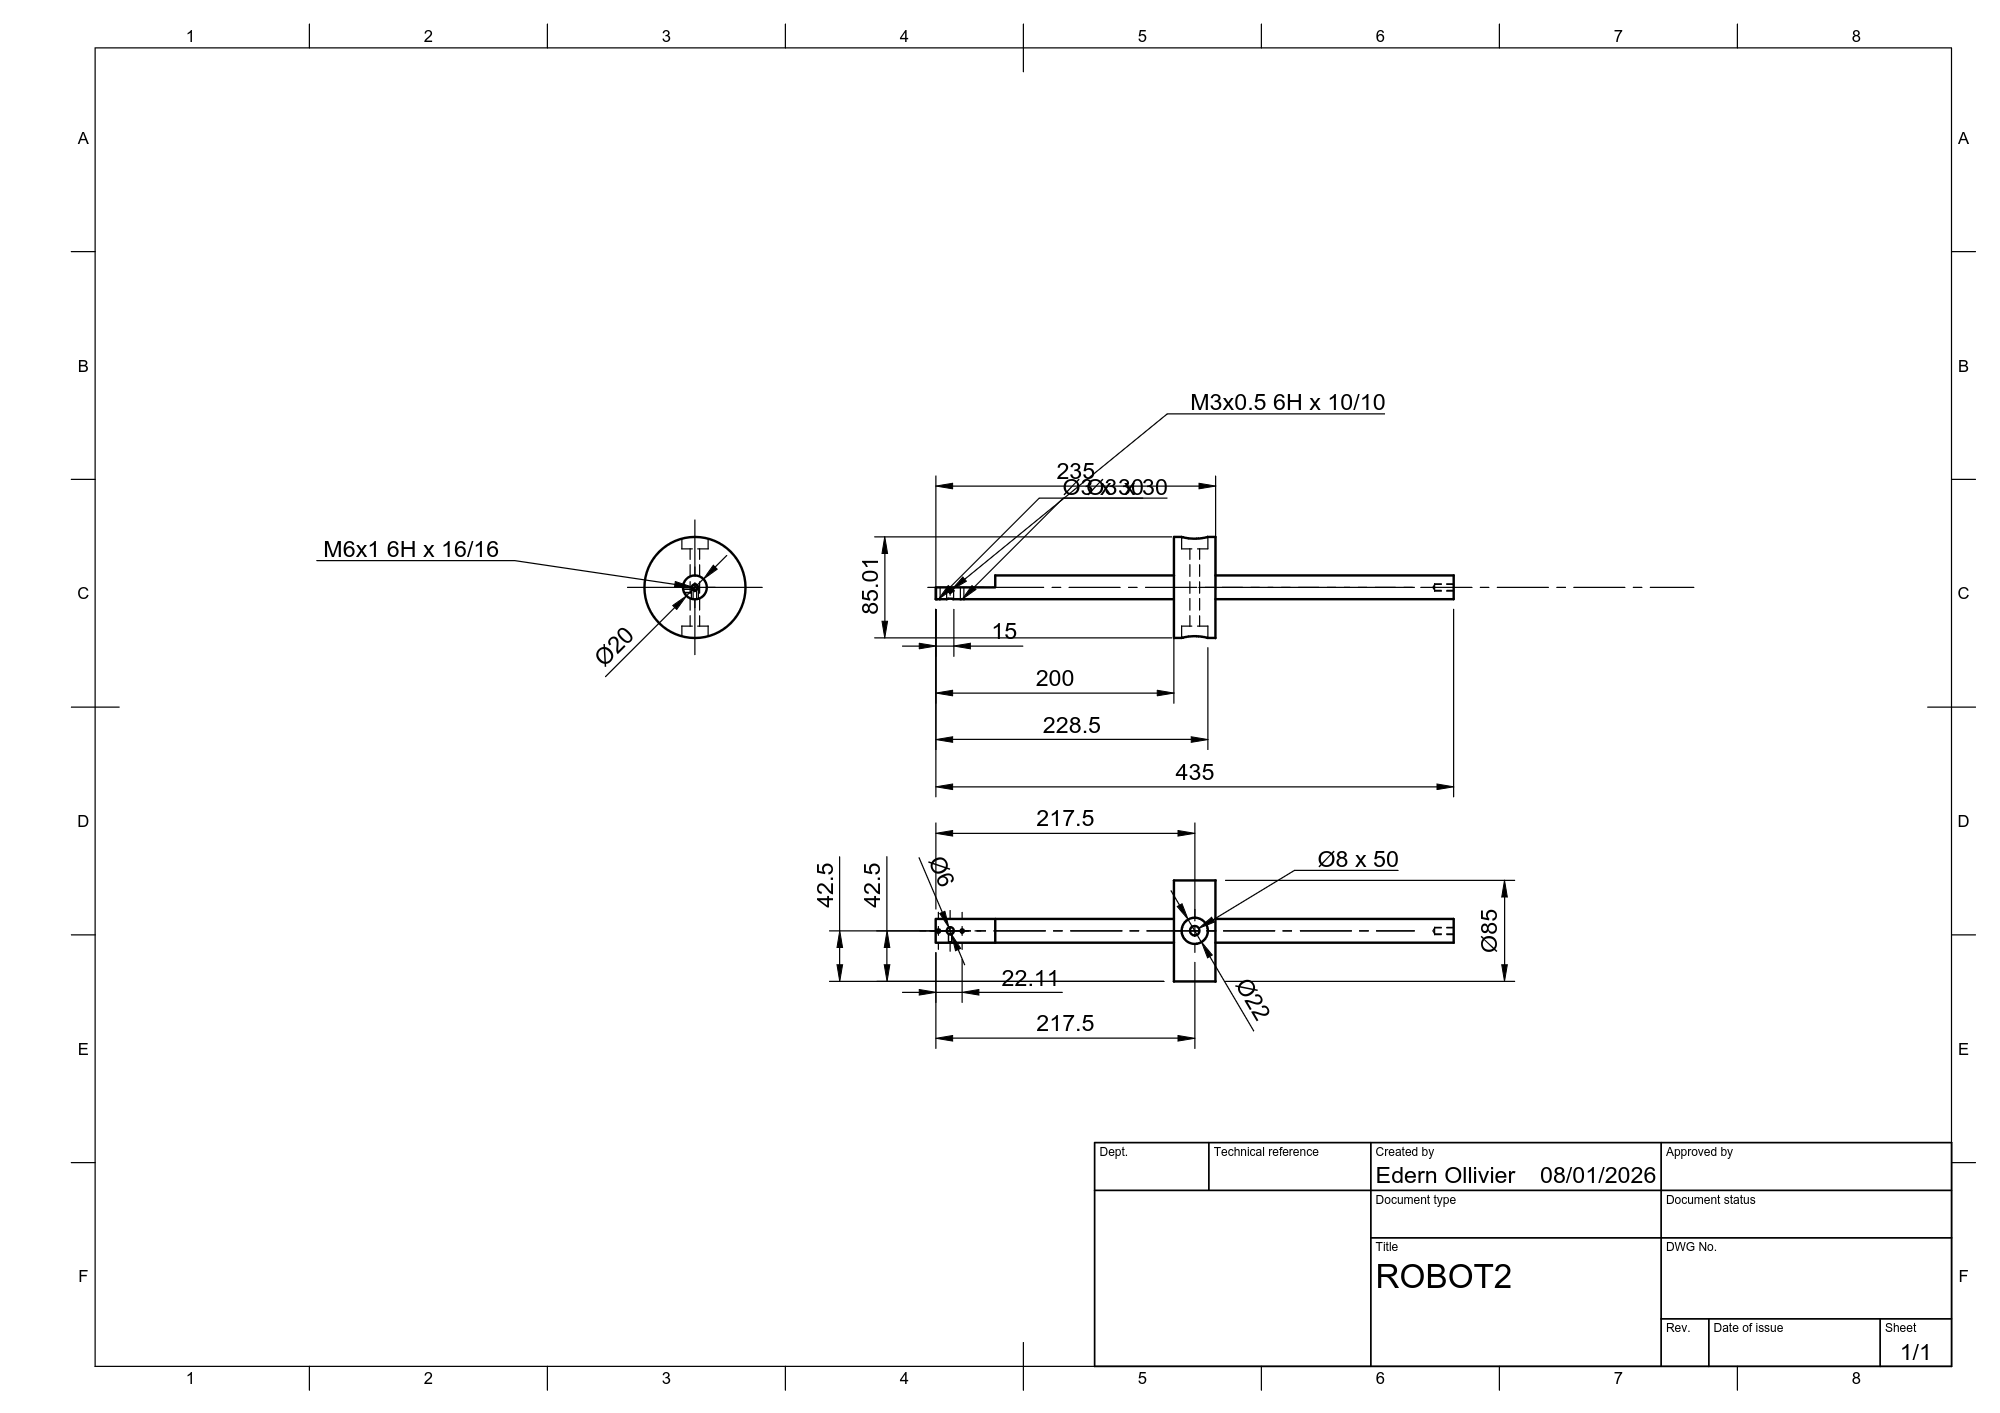
Part two of the mechanical drawings of the gimbals
It is the gimbal of the robot.
file.None
Part three of the mechanical drawings of the gimbals
It is the gimbal of the robot.
file.None
Comments
Only logged in users can leave comments