Pad Pedal
This pedal is used by musicians in a band (e.g. bass or guitar player) to play pads (background chords), the pedal sends MIDI signals to a PC that plays the sounds using VSTs or DAWs.
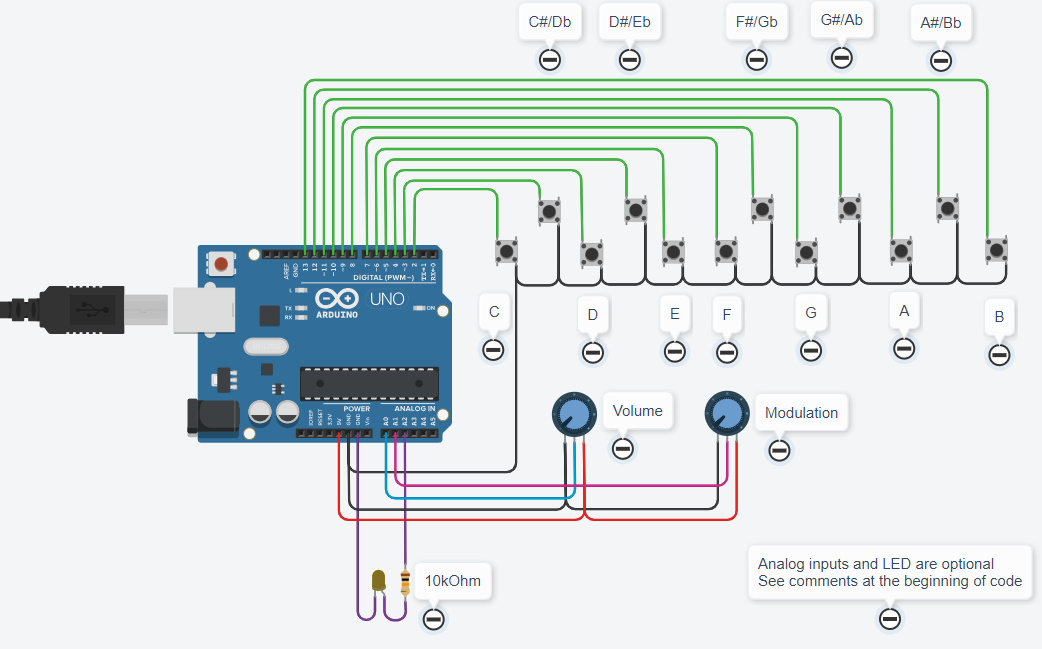
Devices & Components
1
5 mm LED: Yellow
12
Guitar pedal button
1
Any Arduino or Arduino compatible board
1
Resistor 10 kΩ
2
10kOhm potentiometer
Hardware & Tools
1
drill, screwdriver, soldering iron
Software & Tools
1
VST/VST3 (any)
1
Hairless MIDI/Serial Bridge
1
loopMIDI
Project description
Code
PadPedal
c
A0, A1: see comments at the beginning of the code.
1/*
2  Autor  : Jorge Bourdette
3  Version 1.0 - 12/8/2023 - Base version
4  Version 1.1 - 26/9/2023 - Added LED
5  MIDI base code: MIDImalista by Daniel Marcial (@danielmarcial22)
6  Buttons are connected to pins 2 to 13, corresponding to notes C4, C#4, D4, etc.
7  Each note plays until a button is pressed.
8  At start, each note plays together with the 5th (C4+G4, C#4+G#4, etc.) - this can be changed by
9    pressing F+G, G+A or A+B, see below.
10  Potentiometers can be added to:
11  - analog input A0 for sound volume
12  - analog input A1 for modulation - eg vibrato, depending on the VST used
13  A led is connected - in series with a 10 kOhm resistor - to A2 output.
14
15  Features:
16  - pressing a button, the corresponding note plays until the same or other button is pressed
17  - pressing a different button, the note changes to the new one
18  - by pressing 2 buttons together:
19      C+D: goes down one octave each time they are pressed
20      D+E: goes up one octave each time they are pressed
21      F+G: starts playing only the note pressed (I)
22      G+A: starts playing the note pressed and a 5th together (I+V)
23      A+B: starts playing the note pressed, a 5th and an octave together (I+V+VIII)
24  - If there is a potentiometer in A0, it is used as general MIDI volume
25  - If there is a potentiometer in A1, it is used for modulation
26      (the actual effect depends of the VST used, e.g. vibrato, reverb, sustain, etc.)
27  - If potentiometer(s) are used, set the corresponding variable(s) below to "true"
28*/
29const boolean controlVolumen = false;      // true if potentiometer connected to A0
30const boolean controlModulacion = false;   // true true if potentiometer connected to A1
31const unsigned long filtro = 20;           // contact rebound filter, default 20ms
32
33// =========== do not change anything below this ===============
34//
35#define LED_PIN A2
36const int nBotones = 12;                              // número de botones
37const int nPotes = 2;                                 // número de potes (aunque no estén conectados)
38const unsigned char MIDI_CHAN = 1;                    // número de canal MIDI, de 1 a 16
39const unsigned char MIDI_OFF = 127;                   // se suma el nro de canal 1..16
40const unsigned char MIDI_ON = 143;                    // se suma el nro de canal 1..16
41const unsigned char MIDI_CC = 175;                    // se suma el nro de canal 1..16
42const unsigned char CC_VOLUMEN = 7;                   // Control de volumen del canal
43const unsigned char CC_MODULACION = 1;                // Control de modulación del canal
44const unsigned char CC_ALLNOTESOFF = 123;             // Control para apagar todas las notas
45boolean notaion[nBotones];                            // true si se envió comando MIDI ON, false si se envió comando MIDI OFF
46boolean apretado[nBotones];                           // true si el botón estaba apretado, false si se soltó
47int entradaActual[nBotones];                          // estado actual de la entrada
48int entradaPrevia[nBotones];                          // estado anterior de la entrada
49unsigned long timerCambio[nBotones];                  // timer que dice cuándo cambió el botón (para filtrar rebotes en la entrada)
50byte notas[] = {60,61,62,63,64,65,66,67,68,69,70,71}; // estas son las notas que se dispararán los botones
51byte notaInicial = 60;                                // nota inicial DO4
52int lecturaPote[] = {0,0};                            // lectura potenciómetro de volumen y de pitch bend
53int lecturaAntes[] = {0,0};                           // lectura anterior para ver si cambiaron
54boolean sumarV = true;                                // agregar V
55boolean sumarVIII = false;                            // agregar VIII
56
57void setup() {
58  Serial.begin(115200);
59  for (int i=0;i<nBotones;i++)
60  {
61    pinMode(i+2, INPUT_PULLUP);
62    notaion[i]= false;
63    apretado[i]= false;
64    entradaActual[i] = HIGH;
65    entradaPrevia[i] = HIGH;
66  }
67  pinMode(LED_PIN, OUTPUT);
68}
69
70void midi(unsigned char command, unsigned char note,unsigned char vel)
71{
72  command += MIDI_CHAN;
73  Serial.write(command);
74  delayMicroseconds(100);
75  Serial.write(note);
76  delayMicroseconds(100);
77  Serial.write(vel);
78  delayMicroseconds(100);
79}
80
81boolean algunoApretado()
82{
83  for (int i=0; i<nBotones; i++) if (apretado[i]) return true;
84  return false;
85}
86
87void apagarNotas()
88{
89  // apagar todas las notas
90  midi(MIDI_CC, CC_ALLNOTESOFF, 0); // si está sonando alguna nota, apagarla
91  for (int i=0; i<nBotones; i++) notaion[i] = false;
92  digitalWrite(LED_PIN, LOW);
93}
94
95void tocarNota(int boton)
96{
97  // primero apagar si hay notas sonando
98  apagarNotas();
99  // luego reproducir la nota nueva
100  midi(MIDI_ON,notaInicial+boton,100);
101  if (sumarV) midi(MIDI_ON,notaInicial+boton+7,100); // peor caso 108+11+7=126
102  if (sumarVIII && (notaInicial<108)) midi(MIDI_ON,notaInicial+boton+12,100); // peor caso 96+11+12=119, no sumo octava en el alto rango
103  notaion[boton] = true;  //la nota queda sonando
104  digitalWrite(LED_PIN, HIGH);
105}
106
107void realizarComando(int t2)
108{
109  int t1;
110  int x;
111  apagarNotas();
112  for (int i=0; i<nBotones; i++) if (apretado[i]) t1=i; // t1 = tecla que ya estaba apretada
113  apretado[t2]=true;                                    // t2 = tecla que acabo de apretar
114  if (t1>t2) {x=t1; t1=t2; t2=x;}                       // me aseguro que t1<t2 para los "if" que siguen
115  // identificar y ejecutar comando
116  if ((t1==0) && (t2==2)) if (notaInicial>0) notaInicial -= 12; // DO+RE: bajar una octava 60>48>36>24>12>0
117  if ((t1==2) && (t2==4)) if (notaInicial<108) notaInicial += 12; // RE+MI: subir una octava 60>72>84>96>108 (120 no porque se pasa)
118  if ((t1==5) && (t2==7)) {sumarV=false; sumarVIII=false;} // FA+SOL: tocar solo tónica
119  if ((t1==7) && (t2==9)) {sumarV=true; sumarVIII=false;} // SOL+LA: tocar tónica+V
120  if ((t1==9) && (t2==11)) {sumarV=true; sumarVIII=true;} // LA+SI: tocar tónica+V+VIII
121}
122
123int confirmedInput(int i) // esta función filtra posibles espurios y ruido, necesita señal estable al menos 20 ms
124{
125  int entrada = digitalRead(i+2);
126  if (entrada!=entradaPrevia[i])
127  {
128    timerCambio[i] = millis();
129    entradaPrevia[i] = entrada;
130  }
131  if ((millis()-timerCambio[i]) > filtro) // verifico que mantenga el cambio a los 20 ms
132    if (entrada != entradaActual[i])
133      entradaActual[i] = entrada;
134  return entradaActual[i];
135}
136
137void loop()
138{
139  // 1. Proceso botones
140  for (int i=0; i<nBotones; i++) //la variable i recorre las entradas (botones)
141  {
142    if (confirmedInput(i) == LOW) //botón presionado (filtrado por rebotes/ruido)
143    {
144      if (!apretado[i]) // no estaba apretado (lo acaba de presionar)
145      {
146        if (algunoApretado())
147          realizarComando(i); // si estaba apretado algún otro botón es un comando
148        else
149          if (notaion[i])
150            apagarNotas(); // si estaba sonando, apagar todo
151          else
152            tocarNota(i); // si la nota no estaba sonando, apagar cualquiera que estuviera sonando y tocar ésta
153        apretado[i]=true; // no hago caso a este botón hasta que lo suelte
154      }
155    }
156    else
157      if (apretado[i]) // estaba apretado (lo acaba de soltar)
158        apretado[i]=false;
159  }
160  // 2. Proceso entradas analógicas
161  for (int i=0; i<nPotes; i++)
162  {
163    lecturaPote[i] = map(analogRead(i), 0, 1023, 0, 127); // los MIDI CC siempre son de 0 a 127
164    if (lecturaPote[i]!=lecturaAntes[i])
165    {
166      switch (i)
167      {
168        case 0: // pote de volumen
169          if (controlVolumen)
170            midi(MIDI_CC, CC_VOLUMEN, lecturaPote[i]);
171          break;
172        case 1: // pote de modulación
173          if (controlModulacion)
174            midi(MIDI_CC, CC_MODULACION, lecturaPote[i]);
175          break;
176      }
177      lecturaAntes[i] = lecturaPote[i]; // lo hago antes de modificar el valor con el map()
178    }
179  }
180}
Downloadable files
Pad Pedal circuit
PadPedal Circuit.png
Documentation
Pad Pedal circuit
Potentiometers and LED are optional
PadPedal Circuit.png

Video of Pad Pedal in use
https://www.youtube.com/watch?v=Q-MtA13by1o
Comments
Only logged in users can leave comments