Devices & Components
Arduino Nano
SG90 Micro-servo motor
Jumper wires (generic)
9V Battery Clip
9V battery (generic)
Male/Female Jumper Wires
Switch
Buzzer
Ultrasonic Sensor - HC-SR04 (Generic)
Hardware & Tools
Soldering iron (generic)
Tape, Electrical
Solder Wire, Lead Free
Software & Tools
Arduino IDE
Project description
Code
Automatic hand sanitiser code
arduino
1// include Servo and New ping libraries 2#include <Servo.h> 3#include<NewPing.h> 4 5// declaration of variables 6int trigPin = 9; 7int echoPin = 10; 8float v = 343; 9float d = 0; 10float pingTime = 0; 11 12int servoPin = 2; 13int servoPos = 0; 14 15int buzzPin = 5; 16 17Servo myServo;// create an object called myServo using the servo library 18NewPing sonar(trigPin,echoPin);// create an object called sonar using the New ping library, and mention the parameters as the trigger and echo pins 19 20void setup() 21{ 22 Serial.begin(9600);// initialize our serial monitor, to see the distane from a target to the distance sensor 23 24 // set pin modes for the declareed pins 25 pinMode(trigPin,OUTPUT); 26 pinMode(echoPin,INPUT); 27 pinMode(buzzPin,OUTPUT); 28 29 myServo.attach(servoPin);// attach servo in the Arduino world to the pin which it is connected to 30 myServo.write(servoPos);// make the servo turn to zero degrees after Arduino is powerd up 31} 32 33void loop() 34{ 35 d = sonar.ping_cm();// get the distance from the ultrasonic distance sensor in cm 36// digitalWrite(trigPin,HIGH); 37// delayMicroseconds(10); 38// digitalWrite(trigPin,LOW); 39// delayMicroseconds(10); 40// pingTime = pulseIn(echoPin,HIGH); 41// pingTime /= 10000; 42// d = pingTime*343/2; 43 delay(500); 44 // check is the distance is less than 15cm. If so, set the servo position to 120 degrees, and make the buzzer beep 45 if(d < 15){ 46 servoPos = 120; 47 digitalWrite(buzzPin,HIGH); 48 delay(100); 49 digitalWrite(buzzPin,LOW); 50 } 51 // if distance is greater than 15cm, keep the servo position to 0 degrees 52 else{ 53 servoPos = 0; 54 } 55 digitalWrite(buzzPin,LOW); 56 myServo.write(servoPos);// write the end position of the servo 57 Serial.println(d);// print the distance from the ultrasonic distance sensor to the serial monitor 58}
Automatic hand sanitiser code
arduino
1// include Servo and New ping libraries 2#include <Servo.h> 3#include<NewPing.h> 4 5// declaration of variables 6int trigPin = 9; 7int echoPin = 10; 8float v = 343; 9float d = 0; 10float pingTime = 0; 11 12int servoPin = 2; 13int servoPos = 0; 14 15int buzzPin = 5; 16 17Servo myServo;// create an object called myServo using the servo library 18NewPing sonar(trigPin,echoPin);// create an object called sonar using the New ping library, and mention the parameters as the trigger and echo pins 19 20void setup() 21{ 22 Serial.begin(9600);// initialize our serial monitor, to see the distane from a target to the distance sensor 23 24 // set pin modes for the declareed pins 25 pinMode(trigPin,OUTPUT); 26 pinMode(echoPin,INPUT); 27 pinMode(buzzPin,OUTPUT); 28 29 myServo.attach(servoPin);// attach servo in the Arduino world to the pin which it is connected to 30 myServo.write(servoPos);// make the servo turn to zero degrees after Arduino is powerd up 31} 32 33void loop() 34{ 35 d = sonar.ping_cm();// get the distance from the ultrasonic distance sensor in cm 36// digitalWrite(trigPin,HIGH); 37// delayMicroseconds(10); 38// digitalWrite(trigPin,LOW); 39// delayMicroseconds(10); 40// pingTime = pulseIn(echoPin,HIGH); 41// pingTime /= 10000; 42// d = pingTime*343/2; 43 delay(500); 44 // check is the distance is less than 15cm. If so, set the servo position to 120 degrees, and make the buzzer beep 45 if(d < 15){ 46 servoPos = 120; 47 digitalWrite(buzzPin,HIGH); 48 delay(100); 49 digitalWrite(buzzPin,LOW); 50 } 51 // if distance is greater than 15cm, keep the servo position to 0 degrees 52 else{ 53 servoPos = 0; 54 } 55 digitalWrite(buzzPin,LOW); 56 myServo.write(servoPos);// write the end position of the servo 57 Serial.println(d);// print the distance from the ultrasonic distance sensor to the serial monitor 58}
Downloadable files
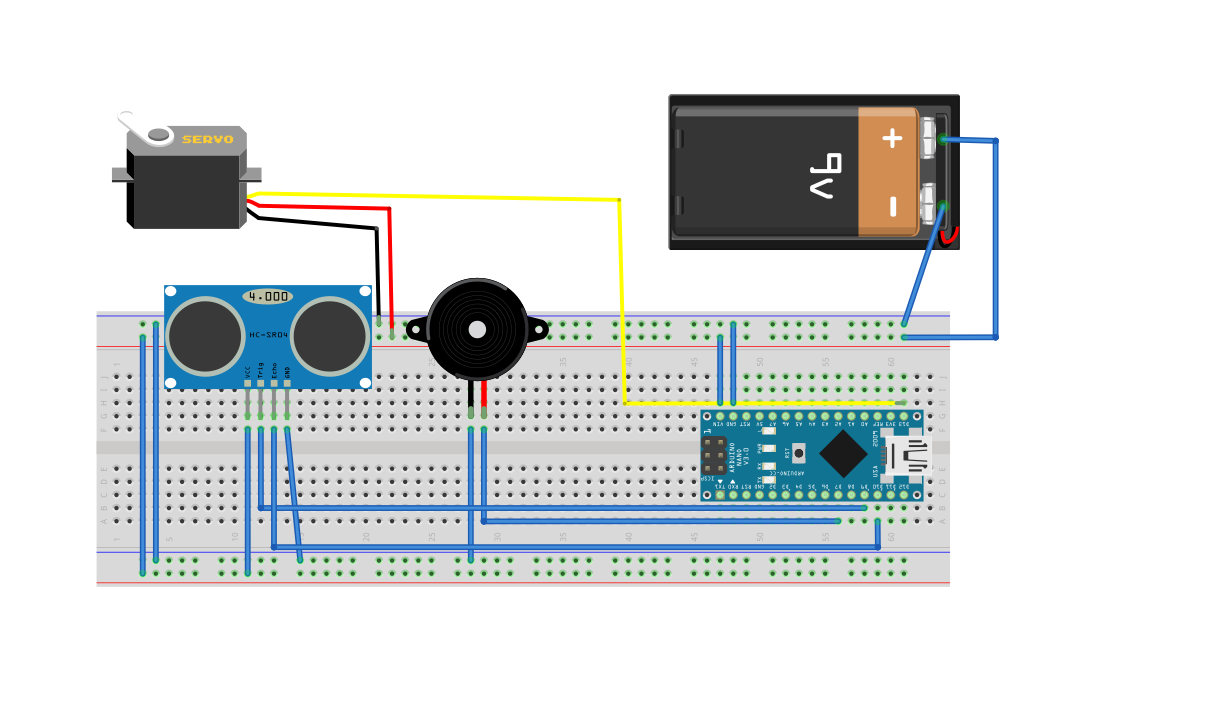
Circuit diagram
Circuit diagram
Comments
Only logged in users can leave comments