Car Steering Wheel Control Unit with Arduino
Car Steering Wheel Control Unit with Arduino with two rotary encoders.
Devices & Components
Arduino Uno Rev3
ATmega328PB microcontroller
Capacitor 100 nF
Capacitor 22 pF
16 MHz Crystal
Multi-Turn Precision Potentiometer- 10k ohms (25 Turn)
Through Hole Resistor, 27 kohm
Capacitor 10 µF
1N4007 – High Voltage, High Current Rated Diode
Resistor 1k ohm
Linear Regulator (7805)
Resistor 10k ohm
Hardware & Tools
Soldering iron (generic)
PCB Holder, Soldering Iron
10 Pc. Jumper Wire Kit, 5 cm Long
Solder Wire, Lead Free
Desoldering Pump, Deluxe SOLDAPULLT®
Project description
Code
Car Steering Wheel Control Unit with Arduino : Code
arduino
This is the code to upload the arduino project
1/*this car steering wheel audio control buttons is programmed as universal  circuit.
2 * This can be used to Volume up and down and, to back and next button.  The both rotary encoder
3 * swiches are recommended for that purposes. and also  more 2 switches are with the rotary encoders.
4 *
5 * Programmed by : BMIAK  Basnayaka
6 * for SetNFix Youtube channel
7 * web : http://www.setnfix.com
8  * date : 08.06.2021
9 * Video Link https://youtu.be/m4KO8INEGUo
10 */
11
12
13
14
15
16//Volume  Controler
17int testPin=A0;
18int volOne = A2;
19int volTwo = A1;
20 int directionV=0;
21  int counterV = 0;
22 int currentStateCLKV;
23 int previousStateCLKV;
24
25//Next  and previous Button
26#define nextOne A4
27#define nextTwo  A3
28 int counterN  = 0;
29 int currentStateCLKN;
30 int previousStateCLKN;
31
32int progSwitch  = A5;
33int progData=0;
34
35int volUp = 12;
36int volDown = 11;
37int back  = 10;
38int next = 9;
39
40int delayMe =0; // Time need to click a button to  activate 1000 = 1 second
41int delayBtn = 2000; // Time need to click a button  to prgramme the buttons 1000 = 1 second
42
43
44
45void setup() {
46  // put  your setup code here, to run once:
47Serial.begin(9600);
48
49pinMode(volOne,INPUT);
50pinMode(volTwo,  INPUT);
51pinMode(nextOne,INPUT);
52pinMode(nextTwo,INPUT);
53pinMode(progSwitch,INPUT);
54pinMode(volUp,OUTPUT);
55pinMode(volDown,OUTPUT);
56pinMode(back,OUTPUT);
57pinMode(next,OUTPUT);
58pinMode(testPin,OUTPUT);
59
60  previousStateCLKV = digitalRead(volOne);
61  previousStateCLKN = digitalRead(nextOne);
62}
63
64void  loop() {
65
66
67progData = analogRead(progSwitch);
68delayMe = map(progData,0,1023,200,2000);
69
70//Serial.println(delayMe);
71volumeControler();
72nextPrevious();
73
74
75
76
77
78//
79//delay(1000);
80
81}
82
83
84void volumeControler(){
85  //Volume Controler
86// Read the current state  of inputCLK
87currentStateCLKV = digitalRead(volOne);
88
89//Serial.println(currentStateCLKV);
90
91   // If the previous and the current state of the inputCLK are different then a  pulse has occured
92   if ((currentStateCLKV == LOW)&&(previousStateCLKV==HIGH)){
93
94//Serial.println(currentStateCLKV);
95     // If the inputDT state  is different than the inputCLK state then
96     // the encoder is rotating counterclockwise
97     if (digitalRead(volTwo)==LOW) {
98
99        digitalWrite(volDown,HIGH);
100        analogWrite(testPin,10);
101        Serial.println("DOWN");
102        delay(delayMe);
103        digitalWrite(volDown,LOW);
104        analogWrite(testPin,0);
105       //previousStateCLKV  = currentStateCLKV;
106
107     } else {
108
109       // Encoder  is rotating clockwise
110        digitalWrite(volUp,HIGH);
111        analogWrite(testPin,20);
112        Serial.println("UP");
113        delay(delayMe);
114        digitalWrite(volUp,LOW);
115        analogWrite(testPin,0);
116      // previousStateCLKV = currentStateCLKV;
117     }
118//Serial.println(counterV);
119   }
120   // Update previousStateCLK  with the current state
121   previousStateCLKV = currentStateCLKV;
122
123
124/*if  (directionV == 1){
125digitalWrite(volDown,HIGH);
126Serial.println("DOWN");
127delay(delayMe);
128digitalWrite(volDown,LOW);directionV  =0;}
129
130if (directionV == 2){
131digitalWrite(volUp,HIGH);
132Serial.println("UP");
133delay(delayMe);
134digitalWrite(volUp,LOW);directionV  =0;}
135*/
136
137
138
139}
140
141void nextPrevious(){
142
143// Read the current  state of inputCLK
144   currentStateCLKN = digitalRead(nextOne);
145
146   //  If the previous and the current state of the inputCLK are different then a pulse  has occured
147   if ((currentStateCLKN==LOW) && (previousStateCLKN==HIGH)){
148
149     // If the inputDT state is different than the inputCLK state then
150     // the encoder is rotating counterclockwise
151     if (digitalRead(nextTwo)  ==LOW) {
152       counterN --;
153        digitalWrite(next,HIGH);
154        analogWrite(testPin,30);
155        Serial.println("BACK");
156        delay(delayMe);
157        analogWrite(testPin,0);
158        digitalWrite(next,LOW);
159
160
161     } else {
162       //  Encoder is rotating clockwise
163       counterN ++;
164        digitalWrite(back,HIGH);
165        Serial.println("NEXT");
166        analogWrite(testPin,40);
167        delay(delayMe);
168        digitalWrite(back,LOW);
169        analogWrite(testPin,0);
170
171     }
172
173   }
174   // Update previousStateCLK with the current state
175   previousStateCLKN = currentStateCLKN;
176 }
Car Steering Wheel Control Unit with Arduino : Code
arduino
This is the code to upload the arduino project
1/*this car steering wheel audio control buttons is programmed as universal
2  circuit.
3 * This can be used to Volume up and down and, to back and next button.
4  The both rotary encoder
5 * swiches are recommended for that purposes. and also
6  more 2 switches are with the rotary encoders.
7 *
8 * Programmed by : BMIAK
9  Basnayaka
10 * for SetNFix Youtube channel
11 * web : http://www.setnfix.com
12
13  * date : 08.06.2021
14 * Video Link https://youtu.be/m4KO8INEGUo
15 */
16
17
18
19
20
21//Volume
22  Controler
23int testPin=A0;
24int volOne = A2;
25int volTwo = A1;
26 int directionV=0;
27
28  int counterV = 0;
29 int currentStateCLKV;
30 int previousStateCLKV;
31
32//Next
33  and previous Button
34#define nextOne A4
35#define nextTwo  A3
36 int counterN
37  = 0;
38 int currentStateCLKN;
39 int previousStateCLKN;
40
41int progSwitch
42  = A5;
43int progData=0;
44
45int volUp = 12;
46int volDown = 11;
47int back
48  = 10;
49int next = 9;
50
51int delayMe =0; // Time need to click a button to
52  activate 1000 = 1 second
53int delayBtn = 2000; // Time need to click a button
54  to prgramme the buttons 1000 = 1 second
55
56
57
58void setup() {
59  // put
60  your setup code here, to run once:
61Serial.begin(9600);
62
63pinMode(volOne,INPUT);
64pinMode(volTwo,
65  INPUT);
66pinMode(nextOne,INPUT);
67pinMode(nextTwo,INPUT);
68pinMode(progSwitch,INPUT);
69pinMode(volUp,OUTPUT);
70pinMode(volDown,OUTPUT);
71pinMode(back,OUTPUT);
72pinMode(next,OUTPUT);
73pinMode(testPin,OUTPUT);
74
75
76  previousStateCLKV = digitalRead(volOne);
77  previousStateCLKN = digitalRead(nextOne);
78}
79
80void
81  loop() {
82
83
84progData = analogRead(progSwitch);
85delayMe = map(progData,0,1023,200,2000);
86
87//Serial.println(delayMe);
88volumeControler();
89nextPrevious();
90
91
92
93
94
95//
96//delay(1000);
97
98}
99
100
101
102void volumeControler(){
103  //Volume Controler
104// Read the current state
105  of inputCLK
106currentStateCLKV = digitalRead(volOne);
107
108//Serial.println(currentStateCLKV);
109
110
111   // If the previous and the current state of the inputCLK are different then a
112  pulse has occured
113   if ((currentStateCLKV == LOW)&&(previousStateCLKV==HIGH)){
114
115
116//Serial.println(currentStateCLKV);
117     // If the inputDT state
118  is different than the inputCLK state then
119     // the encoder is rotating counterclockwise
120
121     if (digitalRead(volTwo)==LOW) {
122
123        digitalWrite(volDown,HIGH);
124
125        analogWrite(testPin,10);
126        Serial.println("DOWN");
127        delay(delayMe);
128
129        digitalWrite(volDown,LOW);
130        analogWrite(testPin,0);
131       //previousStateCLKV
132  = currentStateCLKV;
133
134     } else {
135
136       // Encoder
137  is rotating clockwise
138        digitalWrite(volUp,HIGH);
139        analogWrite(testPin,20);
140
141        Serial.println("UP");
142        delay(delayMe);
143        digitalWrite(volUp,LOW);
144
145        analogWrite(testPin,0);
146      // previousStateCLKV = currentStateCLKV;
147
148     }
149//Serial.println(counterV);
150   }
151   // Update previousStateCLK
152  with the current state
153   previousStateCLKV = currentStateCLKV;
154
155
156/*if
157  (directionV == 1){
158digitalWrite(volDown,HIGH);
159Serial.println("DOWN");
160delay(delayMe);
161digitalWrite(volDown,LOW);directionV
162  =0;}
163
164if (directionV == 2){
165digitalWrite(volUp,HIGH);
166Serial.println("UP");
167delay(delayMe);
168digitalWrite(volUp,LOW);directionV
169  =0;}
170*/
171
172
173
174}
175
176void nextPrevious(){
177
178// Read the current
179  state of inputCLK
180   currentStateCLKN = digitalRead(nextOne);
181
182   //
183  If the previous and the current state of the inputCLK are different then a pulse
184  has occured
185   if ((currentStateCLKN==LOW) && (previousStateCLKN==HIGH)){
186
187
188     // If the inputDT state is different than the inputCLK state then
189
190     // the encoder is rotating counterclockwise
191     if (digitalRead(nextTwo)
192  ==LOW) {
193       counterN --;
194        digitalWrite(next,HIGH);
195        analogWrite(testPin,30);
196
197        Serial.println("BACK");
198        delay(delayMe);
199        analogWrite(testPin,0);
200
201        digitalWrite(next,LOW);
202
203
204     } else {
205       //
206  Encoder is rotating clockwise
207       counterN ++;
208        digitalWrite(back,HIGH);
209
210        Serial.println("NEXT");
211        analogWrite(testPin,40);
212        delay(delayMe);
213
214        digitalWrite(back,LOW);
215        analogWrite(testPin,0);
216
217
218     }
219
220   }
221   // Update previousStateCLK with the current state
222
223   previousStateCLKN = currentStateCLKN;
224 }
Downloadable files
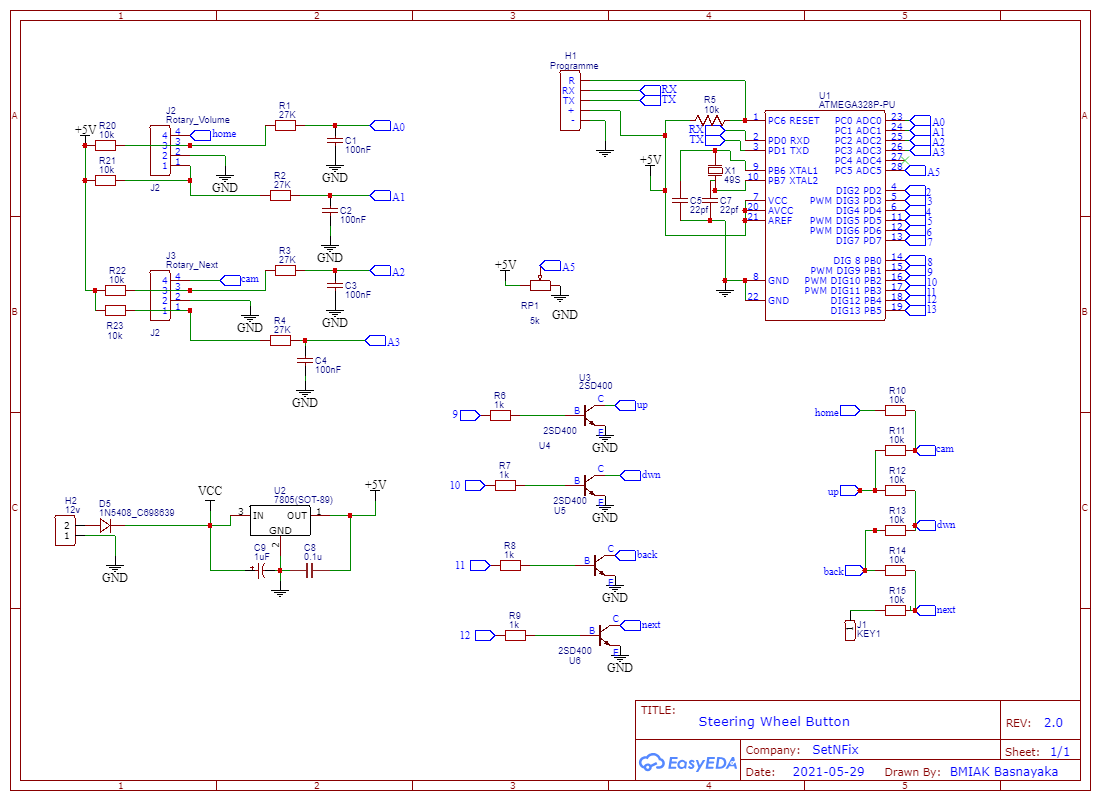
Car Steering Wheel Control Unit with Arduino : Circuit Diagram
You can use this circuit diagram to wire the project
Car Steering Wheel Control Unit with Arduino : Circuit Diagram
Comments
Only logged in users can leave comments