Devices & Components
Arduino Uno Rev3
Jumper wires (generic)
Tactile Button Switch Push To Close
5 mm LED: Green
5 mm LED: Red
Breadboard (generic)
Project description
Code
Button Activation Code
arduino
The system has a go button a stop button and a reset button when the go button is clicked the green led is on showing that it is operational when the stop button is pressed the led goes off displaying a red led to show it has stopped and the rest button kills everything
1const int LED_GREEN = 13; //Giving Pin 13 the name of LED_GREEN 2const int BTN_GO = 2; //Giving Pin 2 the name of BTN_ON 3const int LED_RED = 12; //Giving Pin 12 the name of LED_RED 4const int BTN_STOP = 4; //Giving Pin 4 the name of BTN_OFF 5const int BTN_RESET = 7; 6int btn_state1 = 0; //Declaring the Button State variable 7int btn_state2 = 0; 8int btn_state3 =0; 9void setup() { 10 // put your setup code here, to run once: 11 pinMode(LED_GREEN, OUTPUT); //Setting Pin 13 as an OUTPUT 12 pinMode(BTN_GO, INPUT); //Setting Pin 2 as an INPUT 13 pinMode(LED_RED, OUTPUT); //Setting Pin 12 as an OUTPUT 14 pinMode(BTN_STOP, INPUT); 15 pinMode(BTN_RESET, INPUT); 16 digitalWrite(BTN_GO, HIGH); 17 digitalWrite(BTN_STOP, HIGH); 18 digitalWrite(BTN_RESET, HIGH); 19} 20 21void loop() { 22 // put your main code here, to run repeatedly: 23 btn_state1 = digitalRead(BTN_GO); 24 btn_state2 = digitalRead(BTN_STOP); 25 btn_state3 = digitalRead(BTN_RESET); 26 27 //Once button has been pressed LED stays ON 28 if (btn_state1 == LOW) 29 { 30 digitalWrite(LED_GREEN, HIGH); 31 digitalWrite(LED_RED, LOW); 32 } 33 if (btn_state2 == LOW){ 34 digitalWrite(LED_GREEN, LOW); 35 digitalWrite(LED_RED, HIGH); 36 } 37 if (btn_state3 == LOW) 38 { 39 digitalWrite(LED_GREEN, LOW); 40 digitalWrite(LED_RED, LOW); 41 } 42}
Button Activation Code
arduino
The system has a go button a stop button and a reset button when the go button is clicked the green led is on showing that it is operational when the stop button is pressed the led goes off displaying a red led to show it has stopped and the rest button kills everything
1const int LED_GREEN = 13; //Giving Pin 13 the name of LED_GREEN 2const 3 int BTN_GO = 2; //Giving Pin 2 the name of BTN_ON 4const int LED_RED = 5 12; //Giving Pin 12 the name of LED_RED 6const int BTN_STOP = 4; //Giving 7 Pin 4 the name of BTN_OFF 8const int BTN_RESET = 7; 9int btn_state1 = 0; //Declaring 10 the Button State variable 11int btn_state2 = 0; 12int btn_state3 =0; 13void 14 setup() { 15 // put your setup code here, to run once: 16 pinMode(LED_GREEN, 17 OUTPUT); //Setting Pin 13 as an OUTPUT 18 pinMode(BTN_GO, INPUT); //Setting 19 Pin 2 as an INPUT 20 pinMode(LED_RED, OUTPUT); //Setting Pin 12 as an OUTPUT 21 22 pinMode(BTN_STOP, INPUT); 23 pinMode(BTN_RESET, INPUT); 24 digitalWrite(BTN_GO, 25 HIGH); 26 digitalWrite(BTN_STOP, HIGH); 27 digitalWrite(BTN_RESET, HIGH); 28} 29 30void 31 loop() { 32 // put your main code here, to run repeatedly: 33 btn_state1 = digitalRead(BTN_GO); 34 35 btn_state2 = digitalRead(BTN_STOP); 36 btn_state3 = digitalRead(BTN_RESET); 37 38 39 //Once button has been pressed LED stays ON 40 if (btn_state1 == LOW) 41 42 { 43 digitalWrite(LED_GREEN, HIGH); 44 digitalWrite(LED_RED, LOW); 45 46 } 47 if (btn_state2 == LOW){ 48 digitalWrite(LED_GREEN, LOW); 49 digitalWrite(LED_RED, 50 HIGH); 51 } 52 if (btn_state3 == LOW) 53 { 54 digitalWrite(LED_GREEN, 55 LOW); 56 digitalWrite(LED_RED, LOW); 57 } 58}
Downloadable files
Schematics
If you understand how to read this then i have also included the schematic for you
Schematics
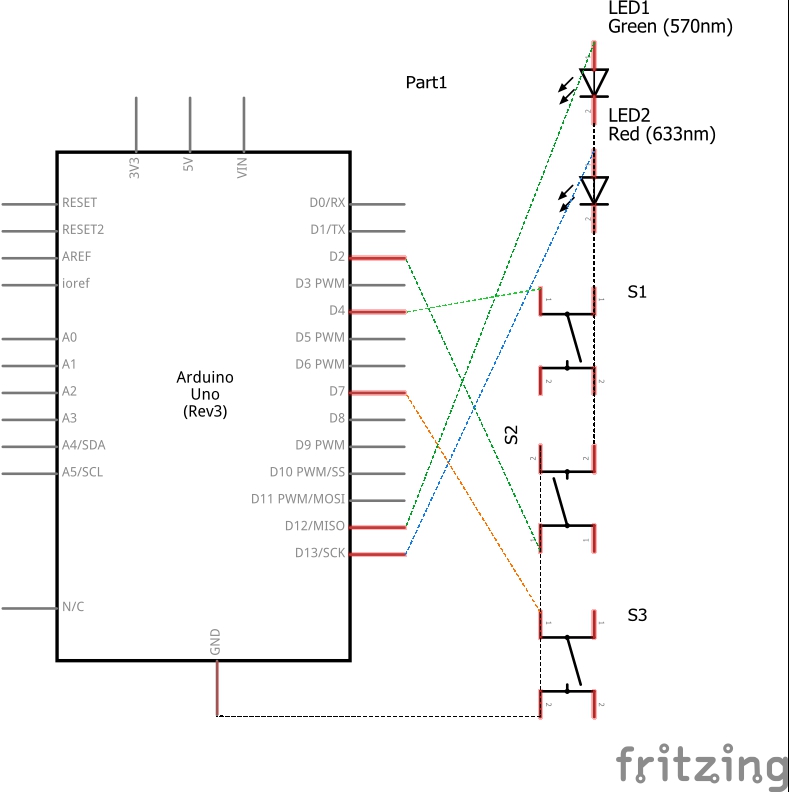
Schematics
If you understand how to read this then i have also included the schematic for you
Schematics

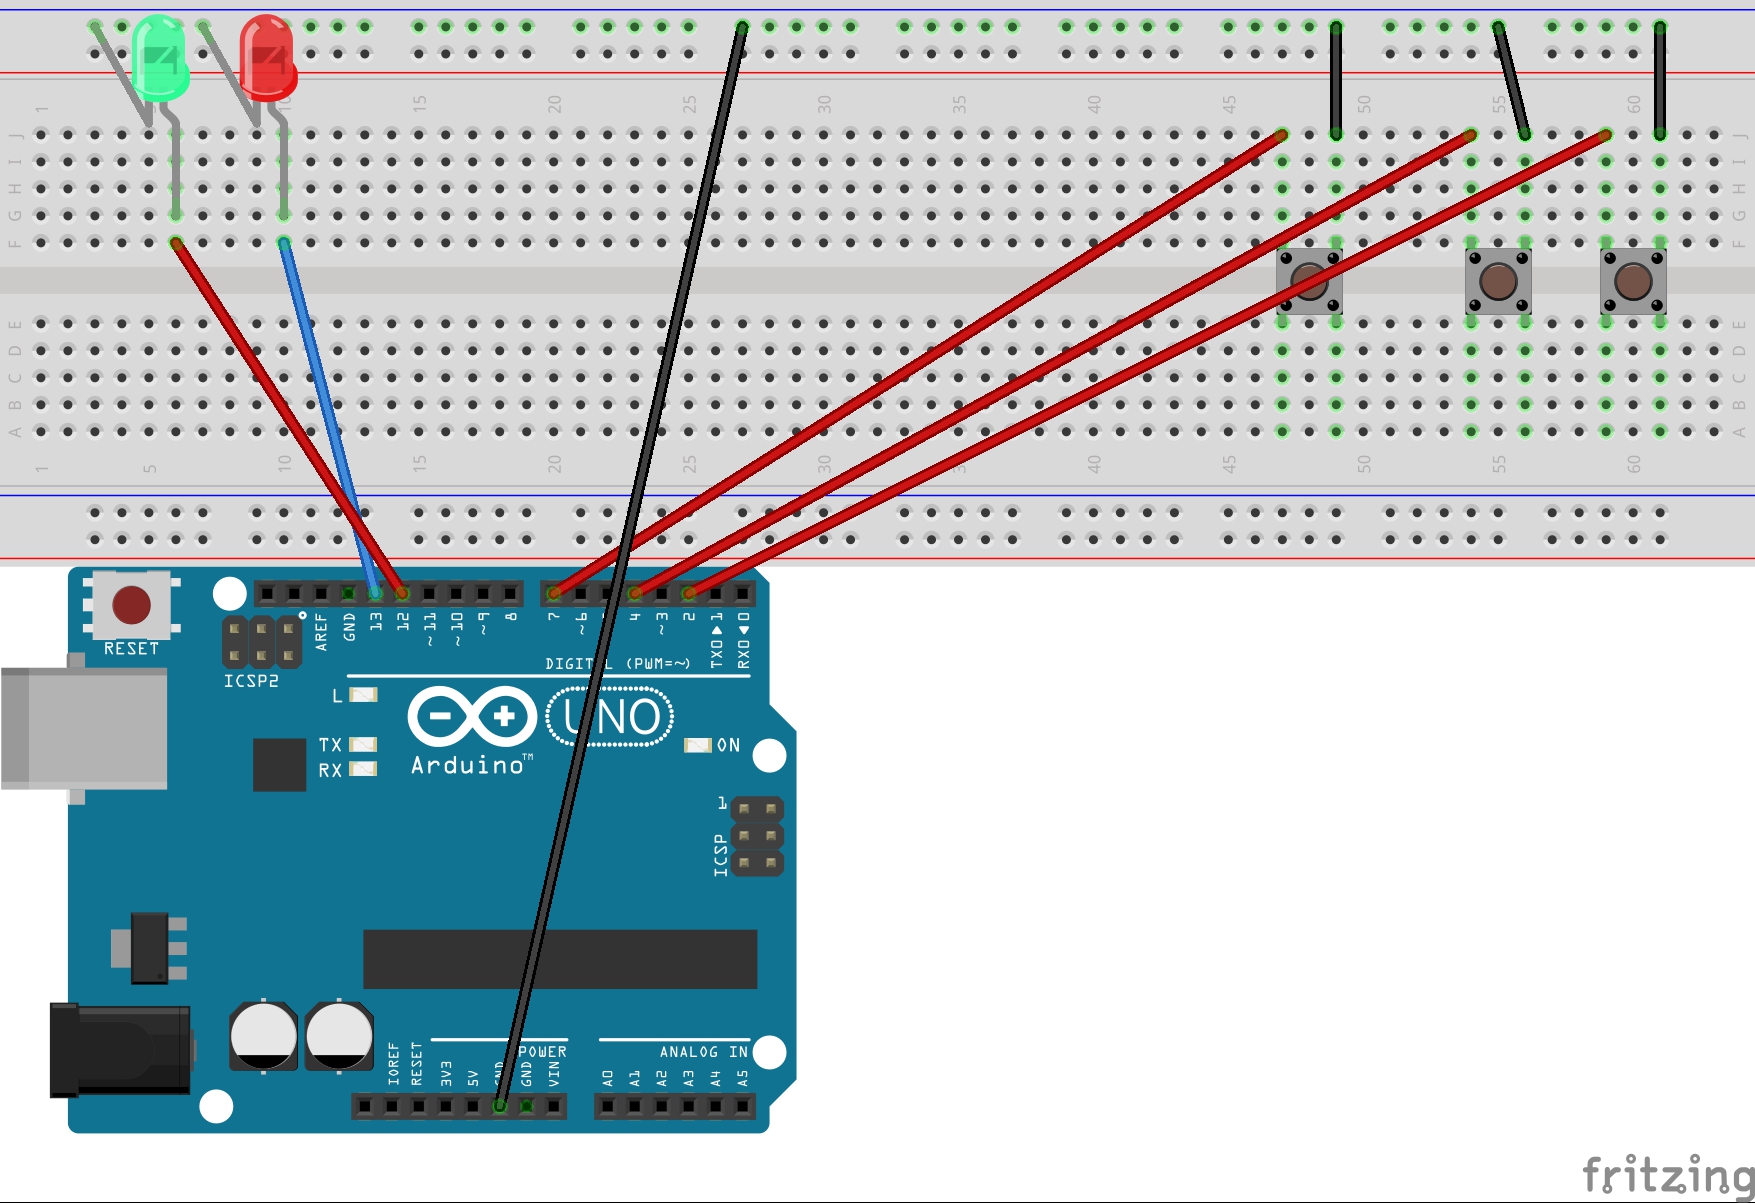
BreadBoard Plans
Shows you exactly how to connect up the parts (Easy to understand)
BreadBoard Plans
Comments
Only logged in users can leave comments